Back up your computers to an exe.dev VM
A restic backup server on your own VM, append-only and encrypted.
Shelley handles the setup. About 15 minutes.
Prefer a terminal?
curl -fsSL https://exe.dev/deploy/backup-to-exe/prompt.txt | ssh exe.dev new --prompt=/dev/stdinNote
This page makes an exe.dev VM the destination for backups of your laptops and servers. To back up exe.dev VMs themselves to S3, see VM backups.
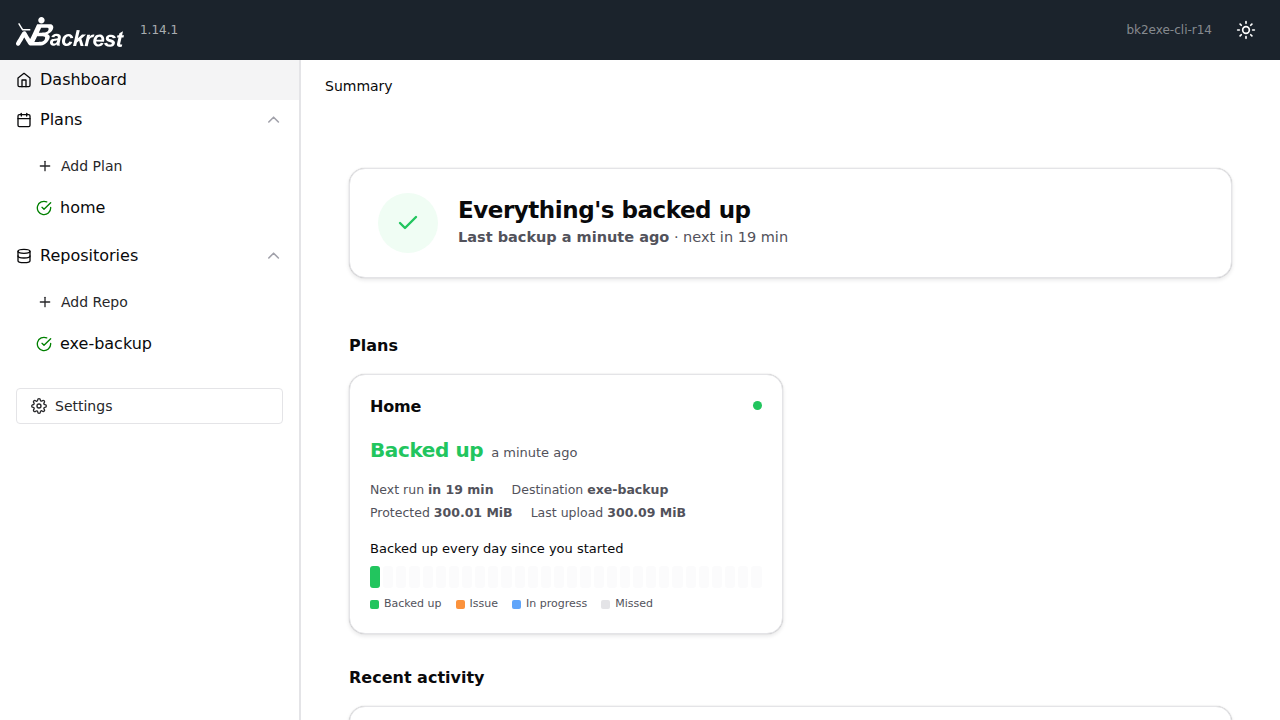
restic encrypts and deduplicates your files on each machine and sends them to a repository. Here the repository lives on an exe.dev VM, served by restic's rest-server in append-only mode: machines can add backups and read them back, but can't delete anything, even if they're hacked. The VM stays private; each machine gets its own revocable exe.dev access. Only you hold the encryption keys. Backrest adds a web UI on desktops.
What you get#
- rest-server 0.14 in append-only mode on port 8000, storing repositories in ~/restic, started at boot.
- The VM private, so only clients with an exe.dev VM token or VM-to-VM integration, or you over SSH, reach the repositories.
- A daily check that emails you when any repository has gone two days without a new snapshot, or the disk is 80% full.
- A test repository created, backed up to, refused a delete, restored, and removed again.
What's running, and where
https://my-backups.exe.xyz/
The backup server, for restic and Backrest with a VM token or VM-to-VM integration per machine
Deploy with Shelley#
Click Deploy and Shelley will set up Backup to exe.dev on a new VM, then check that it works. No config-file wrangling required.
Prefer a terminal?
curl -fsSL \
  https://exe.dev/deploy/backup-to-exe/prompt.txt \
  | ssh exe.dev new --prompt=/dev/stdin
When it's done, run this on your computer (only you can):
ssh exe.dev ssh-key generate-api-key --vm=my-backups --label=backup-laptop --exp=1y --json | jq -r .tokenWhat Shelley is told
Set up Backup to exe.dev on this VM by following the exe.dev recipe at https://exe.dev/deploy/backup-to-exe.md?via=deploy from top to bottom.

The recipe's example VM name is my-backups. This VM's name is the output of `hostname`: use it wherever the recipe writes my-backups. Skip the step that creates the VM; you are on it.

You are done when all of these are true. Check each one yourself:
- rest-server 0.14 in append-only mode on port 8000, storing repositories in ~/restic, started at boot.
- The VM private, so only clients with an exe.dev VM token or VM-to-VM integration, or you over SSH, reach the repositories.
- A daily check that emails you when any repository has gone two days without a new snapshot, or the disk is 80% full.
- A test repository created, backed up to, refused a delete, restored, and removed again.

Read the whole recipe, including the closed details. For initial setup,
follow "Install by hand" first, skipping VM creation and SSH. The
walkthrough at the top is for the owner afterwards.
Work as exedev. Install exactly the pinned versions and check their
checksums. Leave the VM private. Never put a repository password on
this VM except the throwaway one in "Test it", and delete that test
repository afterwards as the steps say. You can't make VM tokens from
the VM; leave tokens and client setup to the owner.
Don't run Update or Restore.
Verify rest-server.service and backup-watch.timer are enabled and
active, port 8000 answers, the append-only test refused the delete,
and backup-watch.sh --dry-run prints ok. Do not reboot.

Finish with the URLs I should open and these commands, which only I can run, from my own computer (with this VM's name in them):
  ssh exe.dev ssh-key generate-api-key --vm=my-backups --label=backup-laptop --exp=1y --json | jq -r .token
Also at /deploy/backup-to-exe/prompt.txt. The recipe it follows is /deploy/backup-to-exe.md.
How it fits together#
- Each machine runs restic or Backrest with its own repository
password and sends encrypted data to
https://my-backups.exe.xyz/<machine>/. - exe.dev's HTTPS proxy lets in only requests with a VM token or from a VM-to-VM integration.
- rest-server stores repositories in
~/resticand refuses deletes. - You prune old snapshots over SSH.
In our tests between two exe.dev VMs, a 300 MB first backup took 22 seconds, the next under a second, and a full restore 3 seconds.
Back up a Linux server#
On your computer, make a token for the server (here web1) and copy it
over. --exp=never and --ips=203.0.113.7/32 are options:
ssh exe.dev ssh-key generate-api-key --vm=my-backups --label=backup-web1 --exp=1y --json \
  | jq -r .token | ssh web1 'cat > /tmp/exe-token'
On the server, install restic 0.20.0 (linux_arm64 on ARM) and
write its settings:
curl -fsSLO https://github.com/restic/restic/releases/download/v0.20.0/restic_0.20.0_linux_amd64.bz2
bunzip2 restic_0.20.0_linux_amd64.bz2
sudo install -m 755 restic_0.20.0_linux_amd64 /usr/local/bin/restic

sudo install -d -m 700 /etc/restic
sudo sh -c 'umask 077; openssl rand -base64 32 > /etc/restic/password'
sudo sh -c "umask 077; cat > /etc/restic/env" <<EOF
RESTIC_REPOSITORY=rest:https://my-backups.exe.xyz/$(hostname)/
RESTIC_REST_USERNAME=token
RESTIC_REST_PASSWORD=$(cat /tmp/exe-token)
RESTIC_PASSWORD_FILE=/etc/restic/password
EOF
rm /tmp/exe-token
printf '%s\n' /etc /home /root /srv | sudo tee /etc/restic/paths
printf '%s\n' '/home/*/.cache' '/root/.cache' | sudo tee /etc/restic/excludes
Warning
Save
/etc/restic/passwordin your password manager. Without it, nobody can restore these backups, including you.
Create the repository and take the first backup:
sudo bash -c 'set -a; . /etc/restic/env; set +a
  restic init
  restic backup --files-from /etc/restic/paths --exclude-file /etc/restic/excludes --exclude-caches --one-file-system'
Dump databases (pg_dump, sqlite3 .backup) into a backed-up directory
first. Then schedule it nightly:
sudo tee /etc/systemd/system/restic-backup.service >/dev/null <<'EOF'
[Unit]
Description=Back up this machine to exe.dev with restic
Wants=network-online.target
After=network-online.target

[Service]
Type=oneshot
EnvironmentFile=/etc/restic/env
Environment=RESTIC_CACHE_DIR=/var/cache/restic
CacheDirectory=restic
ExecStart=/usr/local/bin/restic backup --files-from /etc/restic/paths --exclude-file /etc/restic/excludes --exclude-caches --one-file-system
Nice=10
IOSchedulingClass=idle
EOF
sudo tee /etc/systemd/system/restic-backup.timer >/dev/null <<'EOF'
[Unit]
Description=Back up this machine to exe.dev every night

[Timer]
OnCalendar=*-*-* 02:00:00
RandomizedDelaySec=1h
Persistent=true

[Install]
WantedBy=timers.target
EOF
sudo systemctl daemon-reload
sudo systemctl enable --now restic-backup.timer
Back up another exe.dev VM#
Use a VM-to-VM integration instead of a token. exe.dev holds the key and adds it at the edge, so the VM has no credential to steal or renew. On your computer:
ssh exe.dev integrations add http-proxy --name backups --target https://my-backups.exe.xyz/ --peer --attach vm:my-app
Add more VMs with ssh exe.dev integrations attach backups vm:<name>.
Then follow Back up a Linux server without the
token; /etc/restic/env needs just two lines:
RESTIC_REPOSITORY=rest:https://backups.int.exe.xyz/my-app/
RESTIC_PASSWORD_FILE=/etc/restic/password
In our test, backups, restores and the append-only refusals worked the same as with a token.
Back up a Mac or Windows PC#
Install Backrest, which runs
restic on a schedule with a UI at http://localhost:9898:
- macOS:
brew tap garethgeorge/homebrew-backrest-tap && brew install backrest && brew services start backrest, then givebackrestFull Disk Access in System Settings → Privacy & Security. - Windows:
BackrestSetup-x86_64.exefrom the releases page.
Make a token on your computer:
ssh exe.dev ssh-key generate-api-key --vm=my-backups --label=backup-laptop --exp=1y --json | jq -r .token
In Backrest, Add Repo:
- Repository URI:
rest:https://my-backups.exe.xyz/laptop/ - Password: Generate, and save it in your password manager.
- Env Vars:
RESTIC_REST_USERNAME=tokenandRESTIC_REST_PASSWORD=<the token>. - Prune Policy: Disabled (the server refuses prunes).
Then Add Plan with your home folder, a schedule, and Retention
Policy set to None, and click Backup Now. We tested Backrest
1.14.1 on Linux; the Mac and Windows steps follow Backrest's docs. Plain
restic works too (brew install restic, winget install restic.restic)
with the same settings as environment variables.
Restore, and test that you can#
sudo bash -c 'set -a; . /etc/restic/env; set +a
  restic snapshots
  restic restore latest --target /tmp/restore-test --include /etc/hostname
  restic check --read-data-subset=5%'
Drop --include to restore everything. In Backrest, pick a snapshot and
click Restore to path. Do this monthly.
Prune old snapshots#
Clients can't delete, so you prune over SFTP from your computer, with the machine's repository password:
restic -r sftp:my-backups.exe.xyz:/home/exedev/restic/web1 --password-file web1-password.txt \
  forget --keep-daily 14 --keep-weekly 8 --keep-monthly 12 --prune
That keeps a year of history. ssh my-backups.exe.xyz ls restic lists the
repositories.
Alerts#
backup-watch emails you each morning if a repository has gone 48 hours
without a snapshot or the disk is 80% full. It reads file times, never
backup contents. Try it on the VM with ~/backup-watch.sh --dry-run.
For weekly backups, add Environment=MAX_AGE_HOURS=170 to
/etc/systemd/system/backup-watch.service.
Disk and what it costs#
A repository is about the size of your data after compression, plus history. exe.dev bills disk by what's used, not its size, so make it big up front, or grow it later:
ssh exe.dev resize my-backups --disk=500GB
Your plan includes disk shared by your VMs (100 GB per 2 vCPU on Personal); beyond that it's billed per GiB-month (Usage). Uploads are free; restores count toward outbound bandwidth (200 GB a month on Personal).
Keep a second copy#
Add VM backups of this VM to your own S3 bucket. The data is already encrypted by restic:
ssh exe.dev backup new --bucket=my-bucket --integration=backups my-backups
To sync files between devices instead, see Syncthing.
Leaving Backblaze#
Backblaze's new Privacy Policy, effective December 1, 2026, covers Computer Backup and B2. It says that in the preceding 12 months Backblaze has "sold or shared with third parties for cross-context behavioral advertising" identifiers, network activity, commercial information and geolocation data, and attributes this to tracking technologies such as cookies. It says it doesn't sell or share sensitive personal information; backup contents aren't among the listed categories.
To opt out, sign in at backblaze.com and use Your Privacy Choices in the footer, or send a Global Privacy Control signal. Signed out, the opt-out covers only that browser.
To move restic repositories from B2, copy the whole history to the VM:
set -a; . /etc/restic/env; set +a
export RESTIC_FROM_REPOSITORY=s3:https://s3.us-west-004.backblazeb2.com/my-bucket/restic
export RESTIC_FROM_PASSWORD_FILE=/root/b2-restic-password
export AWS_ACCESS_KEY_ID=<B2 keyID> AWS_SECRET_ACCESS_KEY=<B2 applicationKey>
restic init --from-repo "$RESTIC_FROM_REPOSITORY" --copy-chunker-params
restic copy
We tested copy between restic repositories, not from B2 itself. From
Computer Backup there's nothing to convert: set up restic or Backrest,
and keep Backblaze until you've test-restored. Unlike Computer Backup, a
VM isn't unlimited; check the cost.
Other ways in#
- SFTP for every machine works, but any SSH key that reaches the VM gets a shell and can delete everything.
- An S3 API on the VM (RustFS, Garage): S3
signs requests in the
Authorizationheader, and restic can't add theX-Exedev-Authorizationheader a VM token needs, so the port would have to be public or reached over Tailscale. - Tailscale: point restic at
rest:http://my-backups:8000/, no tokens needed.
The nuts and bolts#
The steps Shelley follows, plus maintenance. Tested November 21, 2026 with rest-server 0.14.0, restic 0.20.0 and Backrest 1.14.1 on Ubuntu 24.04.
Install by hand
Create the VM#
On your computer. Disk is billed by use, so a big one costs nothing until it fills:
ssh exe.dev new --name=my-backups --disk=200GB
ssh my-backups.exe.xyz
(The Deploy button gives the default 25 GB; grow it later.) The rest runs on the VM.
Install rest-server#
Download, verify and install:
cd /tmp
curl -fsSLO https://github.com/restic/rest-server/releases/download/v0.14.0/rest-server_0.14.0_linux_amd64.tar.gz
curl -fsSLO https://github.com/restic/rest-server/releases/download/v0.14.0/SHA256SUMS
sha256sum --ignore-missing -c SHA256SUMS
tar xzf rest-server_0.14.0_linux_amd64.tar.gz
sudo install -m 755 rest-server_0.14.0_linux_amd64/rest-server /usr/local/bin/rest-server
rest-server --version
Expect OK and rest-server 0.14.0.
Run it on port 8000#
exe.dev's proxy does authentication, so rest-server runs --no-auth;
--append-only lets clients add data and remove only their lock files.
mkdir -p ~/restic
sudo tee /etc/systemd/system/rest-server.service >/dev/null <<'EOF'
[Unit]
Description=restic REST server (append-only, behind exe.dev's HTTPS proxy)
After=network-online.target
Wants=network-online.target

[Service]
User=exedev
Group=exedev
ExecStart=/usr/local/bin/rest-server --path /home/exedev/restic --listen :8000 --no-auth --append-only
Restart=always
RestartSec=5
NoNewPrivileges=true
PrivateTmp=true
ProtectSystem=strict
ReadWritePaths=/home/exedev/restic

[Install]
WantedBy=multi-user.target
EOF
sudo systemctl daemon-reload
sudo systemctl enable --now rest-server
sleep 1
journalctl -u rest-server -o cat | tail -n 6
Expect Append only mode enabled and start server on [::]:8000. Keep
the VM private.
Set up backup-watch#
backup-watch.sh emails the VM's owner (via the reflection integration and email gateway) about stale repositories or a full disk.
curl -fsSL https://exe.dev/deploy/backup-to-exe/backup-watch.sh -o ~/backup-watch.sh
chmod 755 ~/backup-watch.sh
sudo tee /etc/systemd/system/backup-watch.service >/dev/null <<'EOF'
[Unit]
Description=Email the owner about stale restic repositories or a full disk

[Service]
Type=oneshot
User=exedev
ExecStart=/home/exedev/backup-watch.sh
EOF
sudo tee /etc/systemd/system/backup-watch.timer >/dev/null <<'EOF'
[Unit]
Description=Check the backups every morning

[Timer]
OnCalendar=*-*-* 09:00:00
Persistent=true

[Install]
WantedBy=timers.target
EOF
sudo systemctl daemon-reload
sudo systemctl enable --now backup-watch.timer
systemctl list-timers backup-watch.timer
The timer should show a next run (times in UTC).
Test it#
A throwaway repository: back up, try a delete, restore, clean up.
cd /tmp
curl -fsSLO https://github.com/restic/restic/releases/download/v0.20.0/restic_0.20.0_linux_amd64.bz2
bunzip2 -f restic_0.20.0_linux_amd64.bz2
sudo install -m 755 restic_0.20.0_linux_amd64 /usr/local/bin/restic
export RESTIC_REPOSITORY=rest:http://localhost:8000/selftest/ RESTIC_PASSWORD=selftest
restic init
restic backup /usr/share/common-licenses
snap=$(restic list snapshots | head -n 1)
curl -s -o /dev/null -w 'delete: %{http_code}\n' -X DELETE "http://localhost:8000/selftest/snapshots/$snap"
restic restore latest --target /tmp/selftest-restore
diff -r /usr/share/common-licenses /tmp/selftest-restore/usr/share/common-licenses && echo restore: identical
rm -rf ~/restic/selftest /tmp/selftest-restore
unset RESTIC_REPOSITORY RESTIC_PASSWORD
~/backup-watch.sh --dry-run
Expect created restic repository, snapshot … saved, delete: 403,
restore: identical, and ok: 0 repositories ….
Installation done. Now set up your first machine: a Linux server, another exe.dev VM, or a Mac or Windows PC.
Update rest-server and restic
Read the changelog, repeat Install rest-server with the new version, and restart:
sudo systemctl restart rest-server
rest-server --version
Repositories are untouched. Update restic on clients the same way (or
brew upgrade restic).
Something not working?
401: the token is missing, expired, removed or for another VM. Make a new one.403onforgetorprune: append-only working. Run them over SSH.repository is already locked: if nothing else is running,restic unlock.unable to locate cache directoryunder systemd: addEnvironment=RESTIC_CACHE_DIR=…andCacheDirectory=restic.502: rest-server is down; checksystemctl status rest-serveranddf -h /.- Backrest:
restic version 0.20.0 is newer than required: harmless.
Frequently asked questions#
Is this the same as exe.dev's VM backups?
No. This page backs up your other machines to a VM. VM backups copy an exe.dev VM's disk to your own S3 bucket; use them for a second copy of this VM.
Can exe.dev, or anyone with the VM, read my backups?
No. restic encrypts everything on your machine before sending it, and the VM never sees the password. Lose the password and the backup is gone for you too.
What if a machine I back up is hacked?
The attacker can read that machine's backups but can't delete or overwrite any: the server is append-only and answers 403. Revoke the machine with ssh exe.dev ssh-key remove backup-web1.
How much does it cost?
The software is free. You pay for your exe.dev plan and any disk beyond what it includes. See Disk and what it costs.
Is this a good Backblaze alternative?
For tens to hundreds of gigabytes, yes: you hold the keys and clients can't delete history. It isn't unlimited. See Leaving Backblaze.
Can several machines share one VM?
Yes. Give each its own repository path, password, and token or integration, so you can revoke one without touching the others.
Published Nov 21, 2026 · Updated Nov 21, 2026 · tested end to end Nov 21, 2026 · Markdown · manifest.json · Something wrong? Tell us