
Self-host Medusa
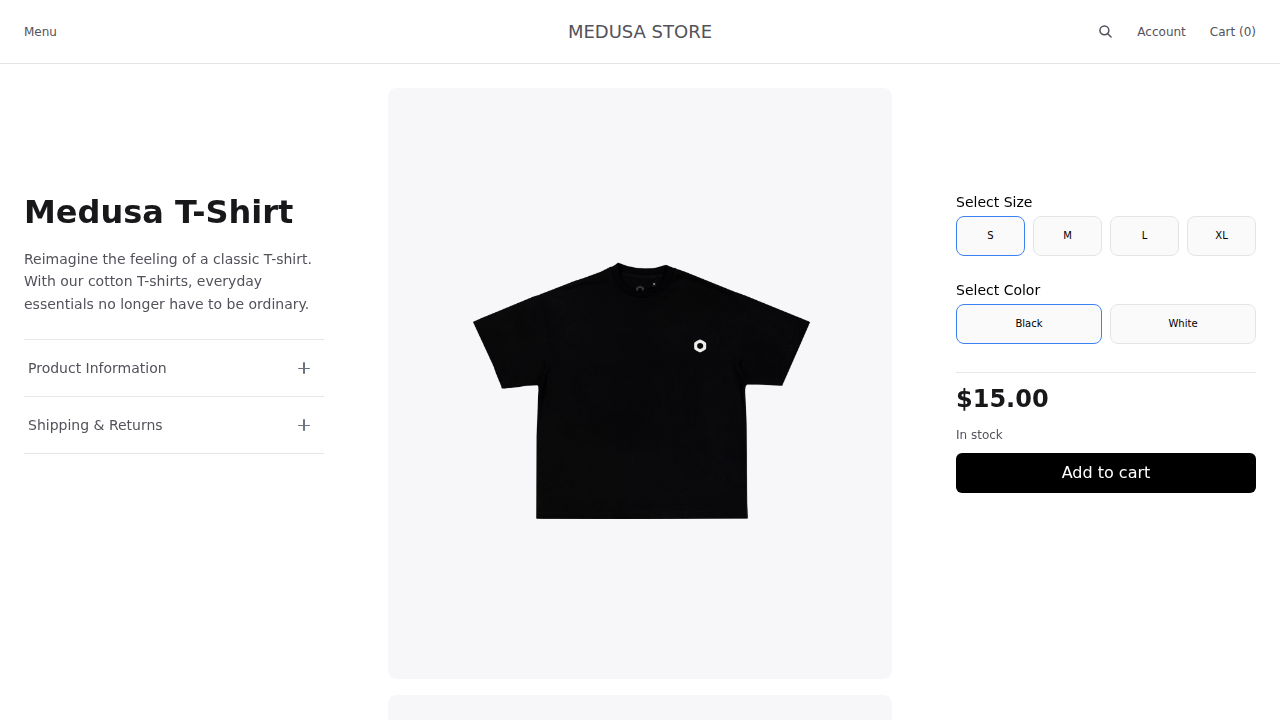
Medusa's server, admin, and Next.js storefront on one VM of their own.
Shelley handles the setup. About 20 minutes.
Prefer a terminal?
curl -fsSL https://exe.dev/deploy/medusa/prompt.txt | ssh exe.dev new --prompt=/dev/stdinMedusa is an open-source commerce platform in TypeScript: a server with a Store API for shoppers and an Admin API for you, an admin dashboard for products, orders, and customers, and a Next.js storefront to start from. It is three programs, a PostgreSQL database, and Redis, which is a lot for a serverless host and just right for a VM of its own. Here they all run on one exe.dev VM, around the clock, with the data on its persistent disk and nightly backups.
The VM is private until you say otherwise. When you make it public, only the storefront and what shoppers need go public: the admin and the Admin API stay on a second port that exe.dev keeps behind its login, so your staff sign in twice and strangers can't knock on the door at all. Every order sends you an email through exe.dev, with no mail provider, and Shelley works next to the code, so "add a size guide to the product page" is a request, a commit, and a deploy.
What you get#
- Medusa 2.23 with its admin and worker on port 9000, and the Next.js starter storefront behind nginx on port 8000, restarting after a reboot.
- PostgreSQL and Redis on the VM, and uploads in ~/medusa-data, backed up every night and before every deploy.
- A storefront you can make public in one command, while the admin and admin API stay on a private port behind exe.dev login.
- An email to you through exe.dev for every order, with no mail provider, and a note in the admin's notification bell.
- ~/store as the one place to change the server and the storefront, and ~/bin/medusa-deploy to build, back up, migrate, and switch, with rollback.
What's running, and where
https://my-medusa.exe.xyz/
the storefront and the Store API, until you make the VM public
https://my-medusa.exe.xyz:9000/app
Medusa's admin and admin API, for people with access to the VM, even when the store is public
Deploy with Shelley#
Click Deploy and Shelley will set up Medusa on a new VM, then check that it works. No config-file wrangling required.
Prefer a terminal?
curl -fsSL \
  https://exe.dev/deploy/medusa/prompt.txt \
  | ssh exe.dev new --prompt=/dev/stdin
When it's done, run this on your computer (only you can):
ssh exe.dev share set-public my-medusaWhat Shelley is told
Set up Medusa on this VM by following the exe.dev recipe at https://exe.dev/deploy/medusa.md?via=deploy from top to bottom.

The recipe's example VM name is my-medusa. This VM's name is the output of `hostname`: use it wherever the recipe writes my-medusa. Skip the step that creates the VM; you are on it.

You are done when all of these are true. Check each one yourself:
- Medusa 2.23 with its admin and worker on port 9000, and the Next.js starter storefront behind nginx on port 8000, restarting after a reboot.
- PostgreSQL and Redis on the VM, and uploads in ~/medusa-data, backed up every night and before every deploy.
- A storefront you can make public in one command, while the admin and admin API stay on a private port behind exe.dev login.
- An email to you through exe.dev for every order, with no mail provider, and a note in the admin's notification bell.
- ~/store as the one place to change the server and the storefront, and ~/bin/medusa-deploy to build, back up, migrate, and switch, with rollback.

Read the whole recipe, including the closed details. For initial setup,
follow "Set up by hand" from "Install the tools" to the end of it, as
exedev; the walkthrough sections are for the owner afterwards. Use the
exact versions given. Never overwrite an existing ~/medusa.env or
~/storefront.env. Don't make the VM public and don't run Restore or
Update. Do not reboot. If a build fails, read its output and fix what
you can; never commit secrets. At the end, create an admin invite for
the owner's exe.dev email (the reflection email) as in "Sign in to the
admin", and give the owner the invite link and
https://<vm>.exe.xyz/. Don't paste anything from ~/medusa.env into the
chat.

Finish with the URLs I should open and these commands, which only I can run, from my own computer (with this VM's name in them):
  ssh exe.dev share set-public my-medusa
Also at /deploy/medusa/prompt.txt. The recipe it follows is /deploy/medusa.md.
Sign in to the admin#
Medusa has its own admin accounts, made from the command line. On the VM, invite yourself (Shelley does this for you at the end of setup):
medusa-cli user -e you@example.com --invite
It prints an invite token. Open https://my-medusa.exe.xyz:9000/app/invite?token= followed by the token, within 24 hours. You'll sign in to exe.dev if you haven't, then choose a password for Medusa. From then on the admin is at https://my-medusa.exe.xyz:9000/app.
To set a password straight away instead, use
medusa-cli user -e you@example.com -p 'a long password'. Invite
colleagues from Settings → Users in the admin, after
giving them access to the VM.
Make your store yours#
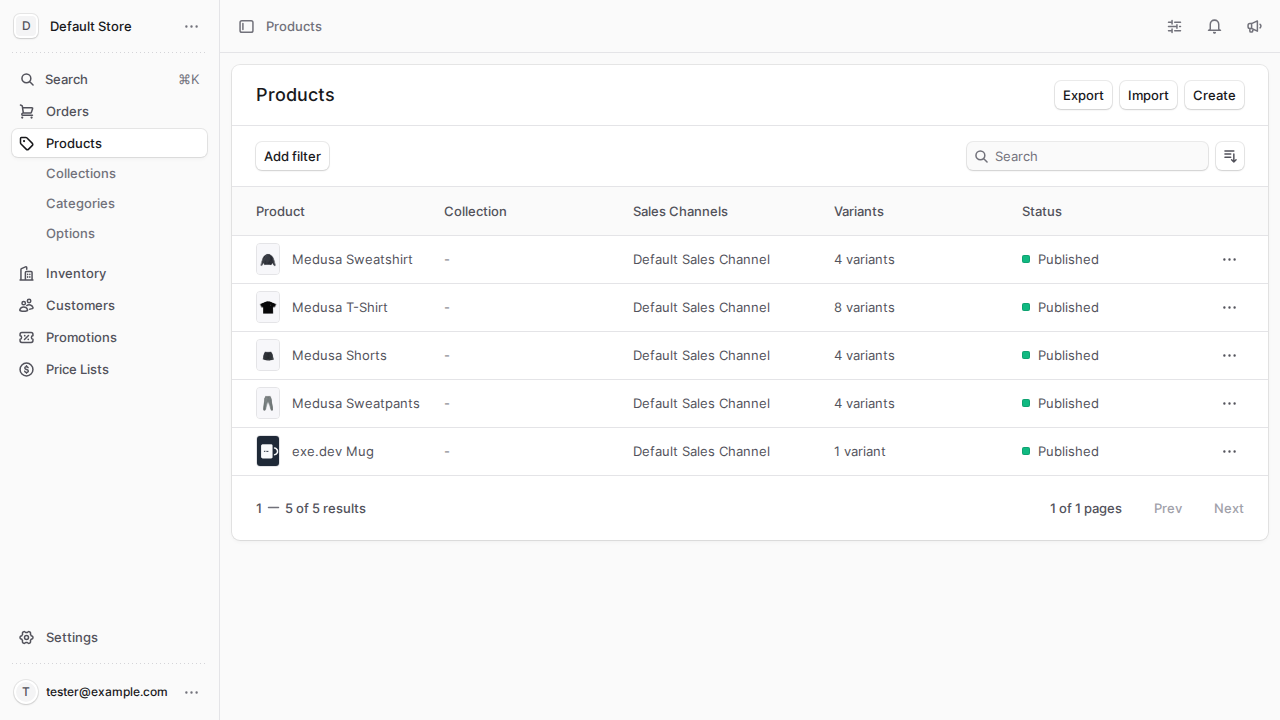
The store starts with Medusa's demo data and one addition: two regions, United States (dollars) and Europe (euros; the UK, Germany, Denmark, Sweden, France, Spain, and Italy), each with Standard and Express shipping at 10 in its currency, manual payment, a warehouse, and four sample products priced in both. The US region comes from us-region.ts, a migration script that runs once on the first deploy. In the admin:
- Settings → Store for the name and currencies, Settings → Regions for the countries you sell to, their currency and taxes, and Settings → Locations & Shipping for where you ship from and what it costs.
- Products → Create for your products. Images go to
~/medusa-data/staticand are served fromhttps://my-medusa.exe.xyz/static/. - Delete or unpublish the demo products.
The storefront lists your products at once: open
https://my-medusa.exe.xyz/ and go through a checkout with manual
payment. The order lands in Orders in the admin and in your inbox.
The storefront opens on the region of NEXT_PUBLIC_DEFAULT_REGION in
~/storefront.env, a country code: us, so https://my-medusa.exe.xyz/
shows dollar prices and /de shows euros. To open on another country,
change it and run ~/bin/medusa-deploy.
Make it public#
When the store is ready for shoppers, on your computer:
ssh exe.dev share set-public my-medusa
Now anyone can open https://my-medusa.exe.xyz/, browse, sign up as a
customer, and check out. The admin isn't part of it: port 9000 stays
private, and nginx on the public port answers 404 for /app,
/admin, and admin sign-in. ssh exe.dev share set-private my-medusa
closes the store again.
Who can reach what#
| Address | Who | What |
|---|---|---|
https://my-medusa.exe.xyz/ |
you, or everyone once public | the storefront |
https://my-medusa.exe.xyz/store/…, /auth/customer/…, /hooks/…, /static/… |
same | the Store API, customer sign-in, payment webhooks, product images |
https://my-medusa.exe.xyz:9000/app |
people with access to the VM, then a Medusa admin account | the admin |
https://my-medusa.exe.xyz:9000/admin/… |
same, or scripts with a VM token | the Admin API |
To let a colleague into the admin, share the VM with them, on your computer:
ssh exe.dev share add my-medusa colleague@example.com
That gives them web access to the VM's private ports (no shell), and an
email invitation if they have no exe.dev account. Then invite them in
Settings → Users, then Copy invite link next to the pending invite
(Medusa has no mail provider here to send it) and send it to them; they open it and choose a
password. ssh exe.dev share remove my-medusa colleague@example.com
takes the first door away, whatever Medusa says.
Call the Admin API from scripts#
The Admin API on port 9000 is behind exe.dev, so a script needs two keys: an exe.dev VM token to get through the proxy, and a Medusa secret API key to get into Medusa. Make the token on your computer:
ssh exe.dev ssh-key generate-api-key --vm=my-medusa --label=medusa-scripts
Make the API key in the admin under Settings → Secret API Keys. Then:
curl -H "X-Exedev-Authorization: Bearer $EXE_TOKEN" -u "$MEDUSA_SECRET_KEY:" \
  'https://my-medusa.exe.xyz:9000/admin/products?limit=5&fields=title,status'
exe.dev strips the X-Exedev-Authorization header before the request
reaches Medusa, which reads the secret key from basic auth. Without the
VM token the answer is 401 from exe.dev, before Medusa sees anything.
On the VM itself, scripts can skip the proxy and call
http://localhost:9000 with just the API key.
Get an email for every order#
apps/backend/src/subscribers/order-placed-email.ts listens for
Medusa's order.placed event. It puts a note in the admin's
notification bell and sends you an email through exe.dev's
email gateway, with the items, the total, and a link
to the order. It goes to ORDER_ALERT_EMAIL in ~/medusa.env, the
email of your exe.dev account; you can change it to anyone you've
shared the VM with.
exe.dev only mails you and the people you share the VM with, so it
can't send customers their order confirmations or password resets. For
those, add a notification provider such as SendGrid
(@medusajs/medusa/notification-sendgrid, built in) or Resend, as in
Medusa's notification docs.
Shelley can write the subscriber and templates; the starter's
confirmation page says an email was sent even when none was.
Take card payments with Stripe#
The storefront already knows Stripe's payment form; Medusa needs your
keys. From the Stripe dashboard,
add the secret key to ~/medusa.env and the publishable key to
~/storefront.env:
echo 'STRIPE_API_KEY=sk_test_...' >> ~/medusa.env
echo 'NEXT_PUBLIC_STRIPE_KEY=pk_test_...' >> ~/storefront.env
In ~/store/apps/backend/medusa-config.ts, add the provider to the
modules list:
    {
      resolve: '@medusajs/medusa/payment',
      options: {
        providers: [
          {
            resolve: '@medusajs/medusa/payment-stripe',
            id: 'stripe',
            options: {
              apiKey: process.env.STRIPE_API_KEY,
              webhookSecret: process.env.STRIPE_WEBHOOK_SECRET,
            },
          },
        ],
      },
    },
Commit and run ~/bin/medusa-deploy, then in the admin open Settings
→ Regions, edit each region, and add Stripe to its payment
providers. Stripe confirms payments through a webhook: in Stripe's
dashboard, add an endpoint at
https://my-medusa.exe.xyz/hooks/payment/stripe_stripe for
payment_intent.succeeded, payment_intent.amount_capturable_updated,
payment_intent.payment_failed, and payment_intent.partially_funded,
put its signing secret in ~/medusa.env as STRIPE_WEBHOOK_SECRET,
and deploy again. Stripe can only reach the webhook once the VM is
public; until then, test with Stripe's test keys and cards.
Change the store with Shelley#
~/store holds the server (apps/backend) and the storefront
(apps/storefront) in one git repository, with an AGENTS.md that
tells Shelley how it's laid out. Ask for what you want ("show stock
levels on the product page", "add a module for gift messages", "a
subscriber that posts orders to Slack"); Shelley edits, commits, and
deploys:
cd ~/store
# ...edit, then:
git commit -am "Gift messages"
~/bin/medusa-deploy
medusa-deploy builds
the last commit into a new release while the old one keeps serving:
packages, the Medusa build, a backup, database migrations, then a
restart of Medusa, and only then the storefront build, which reads
products and regions from the new server. It takes about a minute. If
something looks wrong afterwards, ~/bin/medusa-deploy --rollback puts
the previous release back (code only; migrations stay, so restore a
backup if a migration was the problem).
For bigger changes, try them on a copy of the whole VM first:
ssh exe.dev cp my-medusa my-medusa-test copies the disk, store and
all, to a new private VM; see dev, test, and prod.
On the copy, fix the addresses in both env files before deploying.
Product images in S3#
Images live on the VM's disk, which is simple and backed up with
everything else. To keep them in a bucket instead (say, for a CDN), swap
the file-local provider in medusa-config.ts for Medusa's S3
provider:
          {
            resolve: '@medusajs/medusa/file-s3',
            id: 's3',
            options: {
              file_url: process.env.S3_FILE_URL,
              access_key_id: process.env.S3_ACCESS_KEY_ID,
              secret_access_key: process.env.S3_SECRET_ACCESS_KEY,
              region: process.env.S3_REGION,
              bucket: process.env.S3_BUCKET,
              endpoint: process.env.S3_ENDPOINT,
            },
          },
Put the values in ~/medusa.env and deploy. Any S3-compatible store
works; see S3 storage on exe.dev. Images already
uploaded keep their old URLs, so copy ~/medusa-data/static to the
bucket or leave /static/ served as it is.
Keep your data#
Every night, and before every deploy,
medusa-backup saves a
folder in ~/backups with the database (pg_dump), the uploads, both
env files, and a git bundle of ~/store, keeping the newest 14. On the
same disk, a backup won't survive losing the VM, so keep a copy off
the VM. On your computer:
scp -r my-medusa.exe.xyz:backups medusa-backups
The backups hold your customers' details and Medusa's secrets, so keep
them private. exe.dev's VM backups (in preview) can
also copy the whole disk to your own S3 bucket. Run ~/bin/medusa-backup
on the VM before anything risky. To restore, see
Restore a backup.
Something odd? On the VM, journalctl -u medusa -n 50 or
journalctl -u storefront -n 50 usually explains it, or ask Shelley to
look.
The nuts and bolts#
Everything below is what Shelley runs to set up the VM. Read it to see how the pieces fit, or run it yourself.
Set up by hand
Create the VM#
On your computer (pick another name if my-medusa is taken):
ssh exe.dev new --name=my-medusa
ssh my-medusa.exe.xyz
Everything else runs on the VM, as exedev.
Install the tools#
Medusa 2.23 needs Node.js 22.23.4 or later. Install Node.js 24, the current LTS release, from NodeSource, pnpm 10 through Corepack, and Ubuntu's PostgreSQL, Redis, and nginx:
curl -fsSL https://deb.nodesource.com/setup_24.x | sudo -E bash -
sudo apt-get install -y nodejs postgresql redis-server nginx jq
sudo npm install -g corepack
sudo corepack enable
corepack install -g pnpm@10.34.9
node --version; pnpm --version
systemctl is-active postgresql redis-server
Expect v24. (22.3 or later), 10.34.9, and active twice. Corepack's
own default would be pnpm 12, which refuses to run the build scripts of
Medusa's packages.
Create the database#
A PostgreSQL role and database for Medusa, with a random password that
goes straight into Medusa's settings file, ~/medusa.env:
dbpw=$(openssl rand -hex 24)
sudo -u postgres psql -qc "CREATE ROLE medusa LOGIN PASSWORD '$dbpw'"
sudo -u postgres createdb -O medusa medusa
vm=$(hostname)
umask 077
[ -e ~/medusa.env ] || cat > ~/medusa.env <<EOF
# Medusa's production settings. Back this file up: the secrets below sign
# admin sessions and customer logins, and the database password is here.
NODE_ENV=production
DATABASE_URL=postgres://medusa:$dbpw@localhost:5432/medusa
REDIS_URL=redis://localhost:6379
JWT_SECRET=$(openssl rand -hex 32)
COOKIE_SECRET=$(openssl rand -hex 32)
AUTH_MFA_ENCRYPTION_KEY=$(openssl rand -hex 32)
STORE_CORS=https://$vm.exe.xyz
ADMIN_CORS=https://$vm.exe.xyz:9000
AUTH_CORS=https://$vm.exe.xyz,https://$vm.exe.xyz:9000
MEDUSA_UPLOAD_DIR=$HOME/medusa-data/static
MEDUSA_PRIVATE_UPLOAD_DIR=$HOME/medusa-data/private
MEDUSA_FILE_URL=https://$vm.exe.xyz/static
MEDUSA_WORKER_MODE=shared
MEDUSA_DISABLE_TELEMETRY=true
ORDER_ALERT_EMAIL=$(curl -fsS https://reflection.int.exe.xyz/email | jq -r .email)
EOF
umask 022
[ -e ~/storefront.env ] || cat > ~/storefront.env <<EOF
# The Next.js storefront's settings. No secrets: the publishable key is
# public, and medusa-deploy fills it in on the first deploy.
NEXT_PUBLIC_MEDUSA_BACKEND_URL=https://$vm.exe.xyz
MEDUSA_BACKEND_URL=http://localhost:9000
NEXT_PUBLIC_MEDUSA_PUBLISHABLE_KEY=
NEXT_PUBLIC_DEFAULT_REGION=us
NEXT_PUBLIC_BASE_URL=https://$vm.exe.xyz
EOF
mkdir -p ~/medusa-data/static ~/medusa-data/private ~/bin ~/backups
psql "$(grep ^DATABASE_URL ~/medusa.env | cut -d= -f2-)" -Atc 'select current_user'
Expect medusa. The storefront calls Medusa at its public address from
the browser and at localhost:9000 from its own server, which works
while the VM is private too. ORDER_ALERT_EMAIL is your exe.dev email,
from the VM's reflection service.
Create the store#
create-medusa-app copies Medusa's starter (the server in
apps/backend, the storefront in apps/storefront) and installs its
packages, in about a minute. Skip its database step: the first deploy
migrates and seeds the database from the production build.
cd ~
npx -y create-medusa-app@2.23.0 store --skip-db --with-nextjs-starter --no-browser --use-pnpm
ls ~/store/apps
Expect backend storefront. Now the exe.dev pieces: Medusa's settings
for production (Redis for sessions, events, workflows, and locks;
uploads outside the release), the order email, a United States region
next to the starter's European one, and two small changes to the
storefront so its server talks to Medusa on localhost:
cd ~/store
curl -fsSL -o apps/backend/medusa-config.ts https://exe.dev/deploy/medusa/medusa-config.ts
curl -fsSL -o apps/backend/src/subscribers/order-placed-email.ts https://exe.dev/deploy/medusa/order-placed-email.ts
curl -fsSL -o apps/backend/src/migration-scripts/us-region.ts https://exe.dev/deploy/medusa/us-region.ts
sed -i 's|^export const sdk = new Medusa(|// On the server, call Medusa directly instead of through the public URL.\nif (typeof window === "undefined" \&\& process.env.MEDUSA_BACKEND_URL) {\n  MEDUSA_BACKEND_URL = process.env.MEDUSA_BACKEND_URL\n}\n\nexport const sdk = new Medusa(|' apps/storefront/src/lib/config.ts
sed -i 's|^const BACKEND_URL = process.env.NEXT_PUBLIC_MEDUSA_BACKEND_URL|const BACKEND_URL =\n  process.env.MEDUSA_BACKEND_URL \|\| process.env.NEXT_PUBLIC_MEDUSA_BACKEND_URL|' apps/storefront/src/middleware.ts
rm -f apps/backend/.env apps/storefront/.env.local
printf '\n# Medusa build output\n.medusa\n' >> .gitignore
grep -c 'process.env.MEDUSA_BACKEND_URL' apps/storefront/src/lib/config.ts apps/storefront/src/middleware.ts
Expect :2 after config.ts and :1 after middleware.ts. The
.env files create-medusa-app wrote held development settings with
weak secrets; ~/medusa.env and ~/storefront.env replace them.
Tell Shelley about the store#
The starter has an AGENTS.md for coding agents; add what's different
here, and make ~/store a git repository:
cat >> ~/store/AGENTS.md <<'EOF'

## On this exe.dev VM

Set up from https://exe.dev/deploy/medusa.

- Production: medusa.service runs the built server and admin from
  ~/current/apps/backend/.medusa/server on port 9000 (private: the admin is
  https://<hostname>.exe.xyz:9000/app). storefront.service runs `next start`
  from ~/current-storefront/apps/storefront on 127.0.0.1:8001. nginx on
  port 8000 (the public port) serves the storefront plus /store, /auth/customer,
  /hooks and /static from Medusa, and 404s the admin.
- Settings: ~/medusa.env and ~/storefront.env, never committed. Uploads:
  ~/medusa-data. Logs: journalctl -u medusa / -u storefront.
- Deploy: commit, then ~/bin/medusa-deploy (install, build, backup,
  db:migrate, restart, storefront build). ~/bin/medusa-deploy --rollback
  goes back one release. Generate migrations for new modules with
  `pnpm medusa db:generate <module>` in apps/backend and commit them.
- ~/bin/medusa-cli runs Medusa's CLI against production (users, invites).
- Email: src/subscribers/order-placed-email.ts uses exe.dev's gateway, which
  only reaches the VM's owner and people it's shared with; customer emails
  need a notification provider.
EOF
cd ~/store
git init -q -b main
git add -A
git commit -qm "Medusa 2.23 store from create-medusa-app, set up for exe.dev"
git log --oneline
Add the scripts#
medusa-deploy builds and switches releases, as in Change the store with Shelley; medusa-backup makes a backup; medusa-cli runs Medusa's command line in the live release with the production settings.
for f in medusa-deploy medusa-backup medusa-cli; do
  curl -fsSL -o ~/bin/$f https://exe.dev/deploy/medusa/$f
done
chmod +x ~/bin/medusa-*
Add the services#
medusa.service runs the server, the admin, and the background worker
in one process on port 9000. storefront.service runs the storefront on
localhost only. nginx
listens on port 8000, exe.dev's default, and decides what the public
port shows. A timer takes a backup every night.
sudo tee /etc/systemd/system/medusa.service >/dev/null <<'EOF'
[Unit]
Description=Medusa server, admin and worker
After=network-online.target postgresql.service redis-server.service
Wants=postgresql.service redis-server.service

[Service]
User=exedev
WorkingDirectory=/home/exedev/current/apps/backend/.medusa/server
EnvironmentFile=/home/exedev/medusa.env
ExecStart=/home/exedev/current/apps/backend/node_modules/.bin/medusa start --port 9000
Restart=always
RestartSec=5

[Install]
WantedBy=multi-user.target
EOF
sudo tee /etc/systemd/system/storefront.service >/dev/null <<'EOF'
[Unit]
Description=Medusa Next.js storefront
After=network-online.target medusa.service

[Service]
User=exedev
WorkingDirectory=/home/exedev/current-storefront/apps/storefront
Environment=NODE_ENV=production NEXT_TELEMETRY_DISABLED=1
ExecStart=/home/exedev/current-storefront/apps/storefront/node_modules/.bin/next start -H 127.0.0.1 -p 8001
Restart=always
RestartSec=5

[Install]
WantedBy=multi-user.target
EOF
sudo tee /etc/systemd/system/medusa-backup.service >/dev/null <<'EOF'
[Unit]
Description=Back up Medusa's database, uploads, settings and code

[Service]
Type=oneshot
User=exedev
ExecStart=/home/exedev/bin/medusa-backup
EOF
sudo tee /etc/systemd/system/medusa-backup.timer >/dev/null <<'EOF'
[Unit]
Description=Back up Medusa every night

[Timer]
OnCalendar=*-*-* 03:00:00 UTC
RandomizedDelaySec=30m
Persistent=true

[Install]
WantedBy=timers.target
EOF
sudo curl -fsSL -o /etc/nginx/sites-available/medusa https://exe.dev/deploy/medusa/medusa.nginx
sudo rm -f /etc/nginx/sites-enabled/default
sudo ln -sfn /etc/nginx/sites-available/medusa /etc/nginx/sites-enabled/medusa
sudo nginx -t
sudo systemctl daemon-reload
sudo systemctl enable medusa storefront
sudo systemctl enable --now nginx medusa-backup.timer
sudo systemctl restart nginx
Expect syntax is ok from nginx. Ubuntu's default nginx site listens
on port 8000 as well as 80 on exe.dev's image, so it has to go.
Deploy and check#
The first deploy builds everything, creates the tables, loads the demo data (regions, shipping, the publishable API key the storefront needs, four products), and starts both services, in about two minutes:
~/bin/medusa-deploy
Expect Live: /home/exedev/releases/... at the end. Then check the
pieces:
systemctl is-active medusa storefront nginx
curl -s http://localhost:9000/health; echo
curl -s -o /dev/null -w '%{http_code}\n' http://localhost:8000/
pk=$(grep ^NEXT_PUBLIC_MEDUSA_PUBLISHABLE_KEY ~/storefront.env | cut -d= -f2)
curl -s -H "x-publishable-api-key: $pk" http://localhost:8000/store/products?fields=title | jq -r '.products[].title'
curl -s -H "x-publishable-api-key: $pk" http://localhost:8000/store/regions?fields=name | jq -r '.regions[].name'
curl -s -o /dev/null -w '%{http_code}\n' http://localhost:8000/app
ls ~/backups
Expect active three times, OK, 200, the four demo products,
Europe and United States, 404 (no admin on the public port), and one backup. Then invite
yourself as in Sign in to the admin:
~/bin/medusa-cli user -e "$(grep ^ORDER_ALERT_EMAIL ~/medusa.env | cut -d= -f2)" --invite 2>&1 | grep -o 'token=[^"\\ ]*' | head -1
and open https://<vm>.exe.xyz:9000/app/invite? followed by what it
prints.
Restore a backup
Each folder in ~/backups has medusa.dump (the database),
medusa-data.tar.gz (uploads), medusa.env, storefront.env, and
store.bundle, the whole git history of ~/store.
On the same VM#
Put the database and uploads back as they were. Take a backup of the present state first, in case you want it back. On the VM:
~/bin/medusa-backup
b=~/backups/20261121-030000      # the backup to restore
sudo systemctl stop storefront medusa
sudo -u postgres dropdb medusa
sudo -u postgres createdb -O medusa medusa
set -a; . ~/medusa.env; set +a
pg_restore --no-owner --exit-on-error -d "$DATABASE_URL" $b/medusa.dump
rm -rf ~/medusa-data
tar -C ~ -xzf $b/medusa-data.tar.gz
sudo systemctl start medusa storefront
If the backup is from before a migration you want to undo, also go back
to the code of that time: ~/bin/medusa-deploy --rollback, or check out
the old commit in ~/store and deploy.
On a new VM#
Copy the backup folder to the new VM's home directory (scp -r), then
follow Set up by hand with three changes:
-
Before "Create the database", put the old settings in place, so the setup keeps them; change the VM name in both files if it differs:
b=~/20261121-030000   # the copied backup folder
install -m 600 $b/medusa.env ~/medusa.env
cp $b/storefront.env ~/storefront.env
and in "Create the database", set
dbpwto the password in the oldDATABASE_URLinstead of a new one. -
Instead of "Create the store" and "Tell Shelley about the store", clone the store from the backup, restore the database and the uploads, and install the packages:
git clone -q -b main $b/store.bundle ~/store set -a; . ~/medusa.env; set +a pg_restore --no-owner --exit-on-error -d "$DATABASE_URL" $b/medusa.dump tar -C ~ -xzf $b/medusa-data.tar.gz -
Carry on from "Add the scripts". The first
medusa-deployfinds the restored tables, migrates only what's new, and leaves your data alone.
Update Medusa and Node.js
Medusa releases often, and its minor versions can include breaking
changes, so read the release
notes between your version
and the new one first. Then move every @medusajs/* package that is on
Medusa's version to the new one, in both apps, and deploy, which backs
up and migrates (@medusajs/ui has versions of its own; the release
notes say when it needs a bump):
cd ~/store
v=2.23.0   # the version to move to
old=$(jq -r '.dependencies["@medusajs/medusa"]' apps/backend/package.json)
sed -i -E "s#(\"@medusajs/[a-z0-9-]+\": \")$old\"#\\1$v\"#" apps/*/package.json package.json
git diff --stat
pnpm install
git commit -qam "Medusa $v"
~/bin/medusa-deploy
Or ask Shelley to do it and to read the release notes first. If the
new version misbehaves, ~/bin/medusa-deploy --rollback brings back the
old code, and Restore a backup brings back the database
from before the migration.
Node.js updates come with sudo apt-get upgrade; restart both services
afterwards with sudo systemctl restart medusa storefront. A new
Node.js major version needs NodeSource's script for that version.
Something not working?
The storefront shows an error, or no products. The storefront reads
regions and products from Medusa when it builds and when it serves.
journalctl -u storefront -n 50 and curl -s localhost:9000/health;
if Medusa isn't answering, journalctl -u medusa -n 50. An empty
NEXT_PUBLIC_MEDUSA_PUBLISHABLE_KEY in ~/storefront.env means the
first deploy didn't finish; run it again.
pnpm install fails with ERR_PNPM_IGNORED_BUILDS. That's pnpm 12;
run corepack install -g pnpm@10.34.9 and deploy again.
The admin says the session expired, or login loops. Open it at
https://my-medusa.exe.xyz:9000/app, not through the public port, and
check that ADMIN_CORS and AUTH_CORS in ~/medusa.env have that
address.
Images don't show. MEDUSA_FILE_URL in ~/medusa.env must be
https://<vm>.exe.xyz/static, and
ls ~/current/apps/backend/.medusa/server/static should list the
uploads (it links to ~/medusa-data/static).
Port 8000 shows nginx's welcome page. The default site is still
enabled: sudo rm /etc/nginx/sites-enabled/default and
sudo systemctl reload nginx.
A migration failed during a deploy. The old release is still live,
and a backup from just before is in ~/backups. Read the error, fix
the code, and deploy again, or restore.
Frequently asked questions#
Is Medusa free to self-host?
Yes. Medusa is open source under the MIT license, apart from its Enterprise features (role-based access and single sign-on for the admin), which need a commercial agreement; this recipe uses none of them. You pay for the VM; see exe.dev plans. Payment providers such as Stripe charge their usual fees.
Do I need Docker to self-host Medusa?
No. Medusa is a Node.js app, and so is the storefront. Here they run as two systemd services next to Ubuntu's PostgreSQL and Redis, which makes deploys, logs, and backups plain files and commands on one VM. Medusa's own docs don't ship an official image either.
How big a VM does Medusa need?
The default VM is plenty for a small store. Medusa uses about 300 MB of memory and the storefront about 150 MB; a deploy takes about a minute and up to 2 GB while it builds. Three releases and pnpm's package store take about 3 GB of disk. Uploads take what they take; ssh exe.dev resize my-medusa --disk=50GB grows the disk.
Can customers check out with a card?
Yes, once you add a payment provider. The store starts with Medusa's manual payment (pay on delivery or by invoice), so you can try orders end to end; Take card payments with Stripe adds Stripe with your own keys.
Why isn't the admin on the public address?
exe.dev makes one port of a VM public, and every other port stays behind exe.dev login. The storefront and the Store API are on the public port 8000; the admin, the admin API, and admin sign-in are only on port 9000, so nobody can even try a password unless you've shared the VM with them.
Can I use my own domain?
Yes. Point a CNAME at my-medusa.exe.xyz as in custom domains, then change the addresses in ~/medusa.env and ~/storefront.env and run ~/bin/medusa-deploy. The admin stays at https://my-medusa.exe.xyz:9000/app.
Published Nov 21, 2026 · Updated Nov 21, 2026 · tested end to end Nov 21, 2026 · Markdown · manifest.json · Something wrong? Tell us


