
Run Kimi Code CLI on a remote server
Moonshot's coding agent, with a Linux box that never sleeps.
Shelley handles the setup. About 5 minutes.
Prefer a terminal?
curl -fsSL https://exe.dev/deploy/kimi-code/prompt.txt | ssh exe.dev new --prompt=/dev/stdinKimi Code CLI is Moonshot AI's
open-source coding agent: a terminal UI, a headless kimi -p mode, and a web
workbench (kimi web), built around Moonshot's Kimi models. An exe.dev VM
gives it a Linux machine that stays on, with your code on persistent disk
and Kimi K3.1 Pro through exe.dev's LLM integration:
no Kimi account or API key needed, with usage billed to your exe.dev account.
There are two ways to use it:
- Everything on the VM. Kimi runs on the VM, as a terminal UI in tmux or as the web workbench, which exe.dev's HTTPS proxy keeps private to you. Start a task, close the laptop, check on it from a phone.
- The VM as a remote environment. Since version 2.5.0 (November 4, 2026), Kimi on your laptop can run its file and shell tools on another machine over SSH, while the model requests, your Kimi login and your session history stay on the laptop. Point it at the VM and your builds, tests and Docker run there.
Both start with the same VM.
What you get#
- Kimi Code CLI 2.5.2 on a VM with Kimi K3.1 Pro and Kimi K3 through exe.dev's LLM integration, with no API key or Kimi account.
- Kimi's web workbench at
https://<vm>.exe.xyz:8627/, behind your exe.dev login and Kimi's own server token, running when you close the tab. - The VM as a remote environment for Kimi Code on your laptop, so commands and builds run on the VM while your login stays local.
- A project folder at
~/projecton persistent disk.
What's running, and where
https://my-kimi-code.exe.xyz:8627/
Kimi Code's web workbench, behind your exe.dev login and Kimi's server token
ssh my-kimi-code.exe.xyz
your terminal, and Kimi on your laptop as a remote environment
kimi 2.5.2, with kimi web managed by systemd
Deploy with Shelley#
Click Deploy and Shelley will set up Kimi Code on a new VM, then check that it works. No config-file wrangling required.
Prefer a terminal?
curl -fsSL \
  https://exe.dev/deploy/kimi-code/prompt.txt \
  | ssh exe.dev new --prompt=/dev/stdin
What Shelley is told
Set up Kimi Code on this VM by following the exe.dev recipe at https://exe.dev/deploy/kimi-code.md from top to bottom.

The recipe's example VM name is my-kimi-code. This VM's name is the output of `hostname`: use it wherever the recipe writes my-kimi-code. Skip the step that creates the VM; you are on it.

You are done when all of these are true. Check each one yourself:
- Kimi Code CLI 2.5.2 on a VM with Kimi K3.1 Pro and Kimi K3 through exe.dev's LLM integration, with no API key or Kimi account.
- Kimi's web workbench at `https://<vm>.exe.xyz:8627/`, behind your exe.dev login and Kimi's own server token, running when you close the tab.
- The VM as a remote environment for Kimi Code on your laptop, so commands and builds run on the VM while your login stays local.
- A project folder at `~/project` on persistent disk.

Run the VM-side commands in "Create the VM" and "Open the web
workbench". If ~/.kimi-code/config.toml already exists, merge the
provider and model tables into it instead of replacing it. Keep
`kimi web` on its default 127.0.0.1 address, never pass
--dangerous-bypass-auth, and never run share set-public. Verify with the
`kimi -p` command and check that `systemctl is-active kimi-web` prints
active. Finish with the workbench URL including its #token= part, from
the command in "Open the web workbench"; this conversation is private to
the owner. Mention that "Use the VM from Kimi on your laptop" is set up
on the owner's own computer, not here.

Finish with the URLs I should open.
Also at /deploy/kimi-code/prompt.txt. The recipe it follows is /deploy/kimi-code.md.
Create the VM#
On your computer, create a VM and connect. Pick any free name; if you've already clicked Deploy or have a VM, skip the first command and use its name:
ssh exe.dev new --name=my-kimi-code
ssh my-kimi-code.exe.xyz
Install Kimi Code by hand
Install Kimi Code#
On the VM, install Kimi Code with Moonshot's install script. It downloads
the Linux build of the kimi binary from the GitHub release, checks its
checksum, puts it in ~/.kimi-code/bin, and adds that folder to your PATH
in ~/.bashrc:
curl -fsSL https://code.kimi.com/kimi-code/install.sh | bash -s -- --version 2.5.2
exec bash -l
kimi --version
Expect 2.5.2. This binary is also the executor that Kimi on your laptop
looks for when it uses the VM as a remote environment.
Point Kimi at Kimi K3.1 Pro#
exe.dev's LLM integration serves Kimi K3.1 Pro and Kimi K3 through
Fireworks, with a one-million-token context window. The VM needs no key:
exe.dev adds credentials on the way out, so api_key is a placeholder.
Write Kimi's config:
mkdir -p ~/.kimi-code ~/project
cat > ~/.kimi-code/config.toml <<'EOF'
# Kimi models through exe.dev's LLM integration: no API key on the VM.
default_model = "exe/kimi-k3.1-pro"

[providers.exe]
type = "openai"
base_url = "https://llm.int.exe.xyz/fireworks/inference/v1"
api_key = "not-a-secret"

[models."exe/kimi-k3.1-pro"]
provider = "exe"
model = "accounts/fireworks/models/kimi-k3p1-pro"
max_context_size = 1048576
capabilities = ["thinking", "image_in", "tool_use"]
display_name = "Kimi K3.1 Pro (exe.dev)"

[models."exe/kimi-k3"]
provider = "exe"
model = "accounts/fireworks/models/kimi-k3"
max_context_size = 1048576
capabilities = ["thinking", "image_in", "tool_use"]
display_name = "Kimi K3 (exe.dev)"
EOF
Check that the setup is sound and a model answers:
cd ~/project
kimi doctor
kimi -p "Create hello.py that prints hello from $(hostname), then run it."
Kimi prints its thinking, writes the file, runs it, and ends with the command to resume the session.
Code in the terminal#
On the VM, start Kimi's terminal UI inside tmux, so it keeps working when you disconnect. Kimi asks for tmux's extended keys, so turn them on first:
echo 'set -g extended-keys on' >> ~/.tmux.conf
tmux new -A -s kimi -c ~/project ~/.kimi-code/bin/kimi
Kimi asks once whether to trust the folder; then give it a task, such as
"Write index.html for a one-page website for a bakery that only sells
sourdough." Kimi asks before it writes files or runs commands; /model
switches between K3.1 Pro and K3. To leave it running, press Ctrl-b then
d. Next time, this puts you back where you were, from your computer:
ssh -t my-kimi-code.exe.xyz 'tmux new -A -s kimi -c ~/project ~/.kimi-code/bin/kimi'
Open the web workbench#
kimi web serves the same agent as a web app: projects, sessions,
approvals, a file browser and a diff of each change. Run it as a service,
so it keeps going when you close the tab and starts again after a reboot.
It stays on 127.0.0.1, and exe.dev's proxy brings port 8627 to
https://my-kimi-code.exe.xyz:8627/, behind your exe.dev login.
--allowed-host lets that address through Kimi's own host check. On the VM:
sudo tee /etc/systemd/system/kimi-web.service >/dev/null <<EOF
[Unit]
Description=Kimi Code web workbench
After=network-online.target
Wants=network-online.target

[Service]
User=exedev
WorkingDirectory=/home/exedev/project
ExecStart=/home/exedev/.kimi-code/bin/kimi web --port 8627 --no-open --allowed-host $(hostname).exe.xyz
Restart=on-failure
RestartSec=5

[Install]
WantedBy=multi-user.target
EOF
sudo systemctl daemon-reload
sudo systemctl enable --now kimi-web
Kimi also protects the workbench with a server token, which it keeps in
~/.kimi-code/server.token across restarts. Wait for the first start to
write it, then print the address with the token in it:
until [ -s ~/.kimi-code/server.token ]; do sleep 1; done
echo "https://$(hostname).exe.xyz:8627/#token=$(cat ~/.kimi-code/server.token)"
Open it and sign in to exe.dev if asked. If Kimi then shows Server token
required, paste the token (the part after #token=); each browser asks
once. Skip the model sign-in screen, since Kimi K3.1 Pro is already set up.
Click New project, add the project folder, trust it, and give Kimi a
task. Each file write and command waits for your Approve unless you
choose Approve for session.
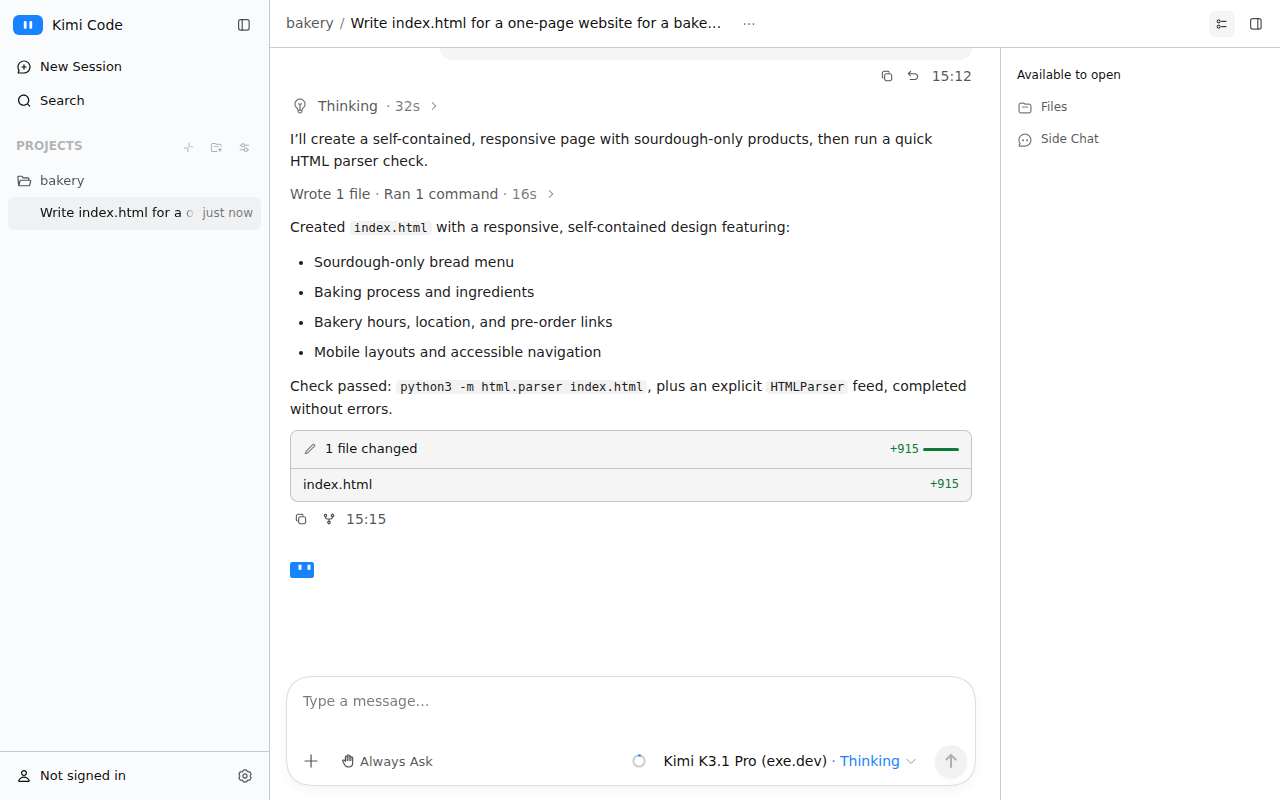
Close the tab whenever you like; running tasks keep going on the VM.
Warning
Anyone who gets past both exe.dev's login and Kimi's token can run commands on the VM. Keep port 8627 private: don't run
share set-publicfor it, and don't pass--dangerous-bypass-auth, which turns Kimi's token off. If the token leaks, runkimi web rotate-tokenandsudo systemctl restart kimi-web.
To step through a session as it unfolds, run Kimi's session visualizer on
the VM with kimi vis --port 8123 --no-open and open
https://my-kimi-code.exe.xyz:8123/. On 127.0.0.1, its default, it has no
login of its own and relies on exe.dev's; Kimi's docs show --host 0.0.0.0,
but exe.dev's proxy doesn't need it, and 2.5.2 refuses it without a
VIS_AUTH_TOKEN.
Use the VM from Kimi on your laptop#
If you already run Kimi Code on your laptop, keep doing that, and let the
VM do the work. Kimi connects with your system ssh, so the key you use for
ssh my-kimi-code.exe.xyz is all it needs. The VM needs the kimi binary
from "Create the VM" (Kimi doesn't install it for you), at the same version
as your laptop's; the model config there doesn't matter in this mode.
On your computer, add the VM to ~/.kimi-code/config.toml:
[environments.my-kimi-code]
type = "ssh"
host = "my-kimi-code.exe.xyz"
defaultCwd = "/home/exedev/project"
Then start a session in it:
kimi --environment my-kimi-code
The footer shows my-kimi-code with the remote folder and its git branch,
and approvals name the target ("Run this command? ssh:my-kimi-code").
Reads, edits and shell commands, including subagents', run on the VM;
the model calls and your Kimi login stay on the laptop. kimi -p works the
same way for scripted runs. --environment-cwd /home/exedev/other picks
another folder for one session, and kimi -r resumes a session in the
environment it was created in. To make the VM the default for new
sessions, add [environments] with default = "my-kimi-code".
A few things stay on the laptop, per the
remote environment guide:
web search and fetch, hooks, and stdio MCP servers. Kimi doesn't load
project agent files from the remote folder by itself; it reads AGENTS.md
when a session starts or resumes, or on /reload. If the connection drops,
tools fail rather than quietly running on your laptop.
Kimi runs ssh non-interactively (BatchMode) and accepts a new host's key
on first use. Every *.exe.xyz VM answers with exe.dev's own
host key, so a VM you delete and recreate under the
same name connects without a key-mismatch error.
To give a laptop access to only this VM, not your whole exe.dev account, use a VM-scoped SSH key. On that laptop:
ssh-keygen -t ed25519 -f ~/.ssh/kimi-vm -N ''
cat ~/.ssh/kimi-vm.pub | ssh exe.dev ssh-key add --vm=my-kimi-code
Run the second command from a computer already signed in to exe.dev, then
add IdentityFile ~/.ssh/kimi-vm for Host my-kimi-code.exe.xyz in the
laptop's ~/.ssh/config.
Frequently asked questions#
Which Kimi Code is this?
The TypeScript Kimi Code CLI, version 2.x, installed with Moonshot's install script or the npm package @moonshot-ai/kimi-code. The older Python kimi-cli is archived, and the PyPI package called kimi-code is a leftover of it, not the new CLI. If you used the old one, the new CLI offers to bring its settings and sessions across (kimi migrate).
Can I use my Kimi membership or a Kimi Platform API key instead?
Yes. With the VM as a remote environment, Kimi on your laptop uses whatever it's signed in to, and nothing goes on the VM. On the VM itself, kimi login --region global (or --region mainland-cn) signs in with a device code you approve in any browser, which keeps a token in ~/.kimi-code on the VM. To keep a Kimi Platform key off the VM, put it in an HTTP proxy integration for https://api.moonshot.ai and point a type = "kimi" provider's base_url at the integration. We tested exe.dev's LLM integration, and saw the device-code login start, but haven't used a Kimi account or Platform key on the VM.
What about Kimi's own Remote Control?
kimi rc lets you drive a machine from Kimi's website and needs a paid Kimi membership. This page doesn't need one: exe.dev's proxy and Kimi's server token protect the workbench instead. You could run kimi rc on the VM too; we haven't tried it.
What does it cost?
Your VM plan plus model usage, billed through the LLM integration. Kimi Code itself is free and MIT-licensed. With a Kimi account or key, Moonshot bills you for its models instead.
How do I update Kimi Code?
Run kimi upgrade -y on the VM, then sudo systemctl restart kimi-web. If you use the VM as a remote environment, keep the VM's kimi on the same version as your laptop's: the docs say a missing or incompatible executor has to be installed or updated by hand.
Something's not working. Where do I look?
kimi doctor on the VM checks the installation and config, and journalctl -u kimi-web -e shows the web workbench's log. Kimi writes its own log to ~/.kimi-code/logs/kimi-code.log. If the browser asks for a server token, paste the contents of ~/.kimi-code/server.token.
How do I back up my work?
Commit and push your code. Sessions and settings live in ~/.kimi-code on the VM. For a copy of the whole VM, run ssh exe.dev cp my-kimi-code my-kimi-code-backup on your computer.
Updated Nov 7, 2026 · tested end to end Nov 7, 2026 · Markdown · manifest.json · Something wrong? Tell us