Self-host Supabase
Your own Supabase on one VM, with Studio behind your exe.dev login.
Shelley handles the setup. About 15 minutes. Needs a 40 GB disk: Shelley sends you a link to grow it.
Prefer a terminal?
curl -fsSL https://exe.dev/deploy/supabase/prompt.txt | ssh exe.dev new --disk=40GB --prompt=/dev/stdinSupabase is Postgres with a backend around it: sign-in, file storage, live updates, an instant REST API, and Studio to manage it all. Here it runs on your own exe.dev VM, from Supabase's official Docker setup, on a persistent disk you can back up and keep.
Studio stays behind your exe.dev login, on a private port. The API is private too until you make it public. Studio's AI Assistant uses exe.dev's LLM gateway, with no OpenAI key, and Shelley can write your migrations, functions, and app right next to the database.
What you get#
- Supabase v0.8.4 running in Docker Compose, with its own generated secrets and keys in
~/supabase/.env(mode 600), and coming back after a reboot. - Studio at
https://<vm>.exe.xyz:8001/, behind exe.dev login and the dashboard password, showing anotestable with one row. - The API on port 8000 answering
GET /rest/v1/noteswith the publishable key, and refusing Studio and/pg/paths. - Studio's AI Assistant answering through exe.dev's LLM gateway.
- The Supabase CLI and rclone installed, and
supabase-backup.timersaving the database and files to~/backupsnightly, with a first backup made.
What's running, and where
https://my-supabase.exe.xyz:8001/
Studio, after exe.dev login and the dashboard password
https://my-supabase.exe.xyz/
The API (/rest/v1, /auth/v1, /storage/v1, ...); make it public when apps elsewhere need it
Deploy with Shelley#
Click Deploy and Shelley will set up Supabase on a new VM, then check that it works. No config-file wrangling required.
Supabase needs a 40 GB disk, more than a new VM has. Shelley checks first and, if it's too small, gives you a link to grow it; the terminal command below makes the VM that size from the start.
Prefer a terminal?
curl -fsSL \
  https://exe.dev/deploy/supabase/prompt.txt \
  | ssh exe.dev new --disk=40GB --prompt=/dev/stdin
When it's done, run this on your computer (only you can):
ssh exe.dev share set-public my-supabaseWhat Shelley is told
Set up Supabase on this VM by following the exe.dev recipe at https://exe.dev/deploy/supabase.md from top to bottom.

The recipe's example VM name is my-supabase. This VM's name is the output of `hostname`: use it wherever the recipe writes my-supabase. Skip the step that creates the VM; you are on it.

This recipe needs a 40GB disk, and a new VM's may be smaller. Before you install anything, run `df -h /`. If its size is under 36G, stop and ask me to grow the disk, either with this link: https://exe.dev/suggest?command=resize%20my-supabase%20--disk%3D40GB or, on my computer, with `ssh exe.dev resize my-supabase --disk=40GB`. When I say it's done, run `sudo resize2fs "$(findmnt -no SOURCE /)"`, check `df -h /` again, and carry on.

You are done when all of these are true. Check each one yourself:
- Supabase v0.8.4 running in Docker Compose, with its own generated secrets and keys in `~/supabase/.env` (mode 600), and coming back after a reboot.
- Studio at `https://<vm>.exe.xyz:8001/`, behind exe.dev login and the dashboard password, showing a `notes` table with one row.
- The API on port 8000 answering `GET /rest/v1/notes` with the publishable key, and refusing Studio and `/pg/` paths.
- Studio's AI Assistant answering through exe.dev's LLM gateway.
- The Supabase CLI and rclone installed, and `supabase-backup.timer` saving the database and files to `~/backups` nightly, with a first backup made.

Read the whole recipe, including the closed details. For initial setup,
follow "Install by hand" first, skipping VM creation and SSH, through the
first backup. The walkthrough at the top is for the owner afterwards. Do
not run the email hook, SMTP, S3, Cloud move, Restore, or Update sections
unless the user asks.
Never print ~/supabase/.env or setup.sh's secret output into the chat; tell
the owner where the dashboard password is (`grep DASHBOARD ~/supabase/.env`).
Don't make the VM public or share it: the owner decides. Leave the `notes`
table in place so the owner can see it in Studio.

Finish with the URLs I should open and these commands, which only I can run, from my own computer (with this VM's name in them):
  ssh exe.dev share set-public my-supabase
Also at /deploy/supabase/prompt.txt. The recipe it follows is /deploy/supabase.md.
Open Studio#
Open https://my-supabase.exe.xyz:8001/ (with your VM's name) and sign in
to exe.dev. Studio then asks for the user supabase and the dashboard
password. On the VM:
grep DASHBOARD ~/supabase/.env
Setup left a notes table with one row in Table Editor; delete it
whenever you like.
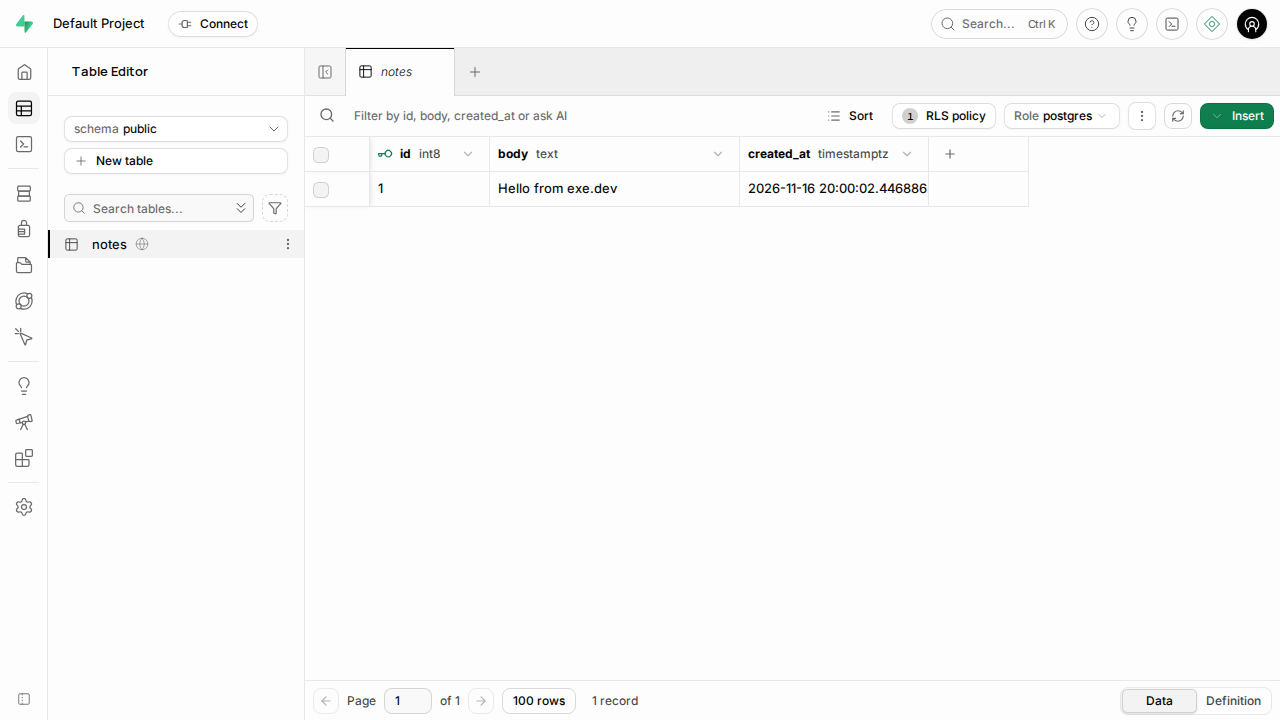
The AI Assistant (top right) explains tables and writes SQL, and runs it once you approve. Its requests count against your exe.dev LLM allocation.
Connect your app#
Your app needs the URL, https://my-supabase.exe.xyz, and a key from
~/supabase/.env:
SUPABASE_PUBLISHABLE_KEY(sb_publishable_…) for browsers and mobile apps. Row Level Security decides what it can see.SUPABASE_SECRET_KEY(sb_secret_…) bypasses Row Level Security. Keep it on servers.
ANON_KEY and SERVICE_ROLE_KEY are their older JWT forms, for older apps.
import { createClient } from '@supabase/supabase-js'

const supabase = createClient('https://my-supabase.exe.xyz', 'sb_publishable_…')
const { data } = await supabase.from('notes').select('body')
Until you make it public, only code on the VM reaches the API, at
http://localhost:8000. For browsers, mobile apps, or servers elsewhere,
on your computer:
ssh exe.dev share set-public my-supabase
Port 8000 answers only Supabase's API paths (/rest/v1, /auth/v1,
/storage/v1, /realtime/v1, /functions/v1, /graphql/v1). Studio
stays on port 8001, which exe.dev never makes public.
Warning
Once the API is public, Row Level Security is what protects your data. Turn it on for every table in
public; Studio's Advisors page flags the ones without it.
To give a teammate Studio, run
ssh exe.dev share add my-supabase teammate@example.com and send them the
dashboard password. For psql from your computer, tunnel to the pooler
with ssh -L 5432:localhost:5432 my-supabase.exe.xyz, then connect to
localhost as postgres.your-tenant-id with POSTGRES_PASSWORD from .env.
Auth emails#
Out of the box, Auth has nowhere to send confirmation, reset, and
magic-link emails, so sign-up fails with Error sending confirmation email.
Pick one:
- While you build: set
ENABLE_EMAIL_AUTOCONFIRM=truein~/supabase/.envand runsh run.sh startin~/supabase. - For a team app: send through exe.dev, with no email account. exe.dev delivers only to you, your team, and people you've shared the VM with.
- For the public: fill in the
SMTP_*lines of.envfor a provider such as Amazon SES or Resend, and runsh run.sh start.
Set SITE_URL in .env to your app's address as well; email links send
people there.
Files#
Uploads live on the VM's disk, in ~/supabase/volumes/storage, and the
nightly backup copies them. To use an S3 bucket instead, see
Store files in S3.
Move from Supabase Cloud#
Dump the database with the Supabase CLI, load it on the VM, and copy the files with rclone: Move a Cloud project has the commands, or ask Shelley. Users, passwords, buckets, and policies come along. Then point your app at the new URL and keys (users sign in once more), add the VM to your OAuth providers' redirect URLs, and recreate edge functions and secrets. Coming from Lovable? Use Migrate from Lovable.
Backups#
Every night, between 03:30 and 04:00 UTC, a timer saves the database as
SQL, the stored files, and .env into ~/backups, keeping seven nights.
Keep a copy off the VM too. On your computer:
scp -r my-supabase.exe.xyz:backups ./my-supabase-backups
.env holds every key, so keep these private.
Restore puts a backup back.
What you give up#
This is Supabase's open-source core, without the Cloud platform:
- One project per install. Use another VM for another project, or for staging.
- No branching, point-in-time recovery, or read replicas; backups are nightly.
- No usage, billing, or log search in Studio; logs come from
sh run.sh logs. - Updates, email, and OAuth setup are yours to run.
Want plain Postgres instead? See PostgreSQL.
The nuts and bolts#
Happy clicking Deploy? You can stop here. These are Shelley's setup steps, plus the commands for later.
Install by hand
Create a VM#
On your computer (pick another name if my-supabase is taken):
ssh exe.dev new --name=my-supabase --disk=40GB
ssh my-supabase.exe.xyz
All remaining installation commands run on the VM, as exedev.
Commands use hostname, so your VM can have any name.
Room on the disk#
Check the disk:
df -h /
If Size is under 38G, the VM was made with a smaller disk. Grow it with
this link
(with your VM's name), or on your computer with
ssh exe.dev resize my-supabase --disk=40GB. Then, back on the VM, grow
the filesystem to match:
sudo resize2fs "$(findmnt -no SOURCE /)"
df -h /
Get Docker and the tools ready#
Enable Docker at boot, so Supabase comes back after a reboot. Then install the Supabase CLI, checked against its release checksums, for database dumps, and rclone for stored files:
sudo systemctl enable --now docker.service
cd /tmp
curl -fsSLO https://github.com/supabase/cli/releases/download/v3.2.0/supabase_3.2.0_linux_amd64.deb
curl -fsSL https://github.com/supabase/cli/releases/download/v3.2.0/checksums.txt |
  grep ' supabase_3.2.0_linux_amd64.deb$' | sha256sum -c
sudo apt-get install -y ./supabase_3.2.0_linux_amd64.deb
curl -fsSL https://rclone.org/install.sh | sudo bash
cd ~
systemctl is-enabled docker.service; supabase --version; rclone version | head -1
Expect supabase_3.2.0_linux_amd64.deb: OK, then enabled, 3.2.0, and
rclone v1. something.
Download Supabase#
Supabase's setup.sh downloads one release into ~/supabase, generates
every secret and key into .env, and pulls about 12 GB of images. It
prints the secrets, so keep only its progress lines:
curl -fsSL https://raw.githubusercontent.com/supabase/supabase/self-hosted/v0.8.4/docker/setup.sh -o /tmp/supabase-setup.sh
sh /tmp/supabase-setup.sh --skip-deps --ref self-hosted/v0.8.4 --project-dir supabase -y | grep '^===>'
ls ~/supabase/.env ~/supabase/.supabase-version
The last line should list both files. Update moves to later releases.
Point it at your VM's address#
Set the three addresses Supabase builds links from to the VM's HTTPS
address, and move the gateway to port 8001, leaving 8000 for the front
door. Then remove setup.sh's leftover copies and make .env private:
cd ~/supabase
url=https://$(hostname).exe.xyz
sed -i \
  -e "s|^SUPABASE_PUBLIC_URL=.*|SUPABASE_PUBLIC_URL=$url|" \
  -e "s|^API_EXTERNAL_URL=.*|API_EXTERNAL_URL=$url/auth/v1|" \
  -e "s|^SITE_URL=.*|SITE_URL=$url|" \
  -e "s|^API_GW_HTTP_PORT=.*|API_GW_HTTP_PORT=8001|" \
  .env
rm -f .env.old docker-compose.yml.old
chmod 600 .env
grep -E '^(SUPABASE_PUBLIC_URL|API_EXTERNAL_URL|SITE_URL|API_GW_HTTP_PORT)=' .env
The four lines should show your VM's address and 8001.
Add the front door#
Supabase's gateway serves Studio and the APIs on one port. A small Caddy
container on port 8000, the one exe.dev can make public, passes on the API
paths only. The same file points Studio's AI Assistant at exe.dev's LLM
gateway. It's docker-compose.override.yml, which updates never touch:
cat > ~/supabase/docker-compose.override.yml <<'EOF'
# exe.dev additions to Supabase's Docker Compose setup. update.sh never
# changes this file. After editing it: sh run.sh start
services:
  # The front door on port 8000, the port exe.dev can make public. It passes
  # Supabase's APIs to the gateway and nothing else. Studio and the rest of
  # the gateway stay on port 8001, which only you can reach.
  front:
    container_name: supabase-front
    image: caddy:2.11-alpine
    restart: unless-stopped
    ports:
      - 8000:8000
    depends_on:
      api-gw:
        condition: service_healthy
    configs:
      - source: front
        target: /etc/caddy/Caddyfile

  # Studio's AI Assistant, through exe.dev's LLM gateway: no OpenAI key.
  studio:
    environment:
      OPENAI_BASE_URL: https://llm.int.exe.xyz/v1
      OPENAI_API_KEY: exe-dev-llm-gateway

configs:
  front:
    content: |
      {
        admin off
        auto_https off
      }
      :8000 {
        @api path /auth/v1/* /rest/v1/* /graphql/v1 /graphql/v1/* /realtime/v1/* /storage/v1/* /functions/v1/* /sso/* /.well-known/oauth-authorization-server/auth/v1
        handle @api {
          reverse_proxy api-gw:8000
        }
        handle {
          respond "Not a Supabase API path. Studio is on port 8001." 404
        }
      }
EOF
cd ~/supabase && sh run.sh config add override
The last command adds it to COMPOSE_FILE in .env, so run.sh and
docker compose use it.
Start Supabase#
cd ~/supabase
sh run.sh start
docker ps --format '{{.Names}}: {{.Status}}' | sort
The first start takes about a minute. Expect twelve containers, all
healthy except supabase-front, which has no health check.
Check the API#
Make a table with one row that anyone may read, then read it through the front door with the publishable key:
cd ~/supabase
docker exec -i supabase-db psql -U postgres -d postgres -v ON_ERROR_STOP=1 <<'EOF'
create table public.notes (
  id bigint generated always as identity primary key,
  body text not null,
  created_at timestamptz not null default now()
);
alter table public.notes enable row level security;
create policy "anyone can read notes" on public.notes
  for select to anon, authenticated using (true);
insert into public.notes (body) values ('Hello from exe.dev');
EOF
sleep 2
key=$(grep '^SUPABASE_PUBLISHABLE_KEY=' .env | cut -d= -f2-)
curl -s 'http://localhost:8000/rest/v1/notes?select=body' -H "apikey: $key"; echo
curl -s -o /dev/null -w '%{http_code}\n' http://localhost:8000/pg/tables
Expect [{"body":"Hello from exe.dev"}], then 404: the database admin
API stays off port 8000. If it says Could not find the table, run the
curl again in a few seconds.
Check Studio#
cd ~/supabase
curl -s -o /dev/null -w '%{http_code}\n' http://localhost:8001/
curl -s -o /dev/null -w '%{http_code}\n' -u "supabase:$(grep '^DASHBOARD_PASSWORD=' .env | cut -d= -f2-)" http://localhost:8001/
Expect 401 without the password and 307 (into Studio) with it.
Set up nightly backups#
~/bin/supabase-backup dumps the database with the CLI, copies stored
files with rclone, and saves .env. Storage checks S3 signatures against
the VM's public address, so rclone uses that name, reaching it through the
front door with HTTP_PROXY:
cd ~/supabase
env() { grep "^$1=" .env | cut -d= -f2-; }
rclone config create supabase s3 provider=Other \
  endpoint=http://$(hostname).exe.xyz/storage/v1/s3 region=$(env REGION) \
  access_key_id=$(env S3_PROTOCOL_ACCESS_KEY_ID) \
  secret_access_key=$(env S3_PROTOCOL_ACCESS_KEY_SECRET) >/dev/null
mkdir -p ~/bin
cat > ~/bin/supabase-backup <<'EOF'
#!/usr/bin/env bash
# Back up Supabase: the database as three SQL files (the same format as a
# Supabase Cloud dump), the stored files, and the settings. Keeps 7 nights.
set -euo pipefail
cd ~/supabase
env() { grep "^$1=" .env | cut -d= -f2-; }
db="postgresql://postgres.$(env POOLER_TENANT_ID):$(env POSTGRES_PASSWORD)@localhost:5432/postgres"
dir=~/backups/$(date +%F)
mkdir -p "$dir"
supabase db dump --remote "$db" -f "$dir/roles.sql" --role-only
supabase db dump --remote "$db" -f "$dir/schema.sql"
supabase db dump --remote "$db" -f "$dir/data.sql" --use-copy --data-only
HTTP_PROXY=http://localhost:8000 rclone sync supabase: ~/backups/storage
cp .env docker-compose.override.yml "$dir/"
chmod -R go-rwx ~/backups
find ~/backups -mindepth 1 -maxdepth 1 -name '20*' -mtime +7 -exec rm -rf {} +
echo "Backed up to $dir"
EOF
chmod +x ~/bin/supabase-backup
A systemd timer runs it nightly:
sudo tee /etc/systemd/system/supabase-backup.service >/dev/null <<'EOF'
[Unit]
Description=Back up Supabase
After=docker.service

[Service]
Type=oneshot
User=exedev
ExecStart=/home/exedev/bin/supabase-backup
EOF
sudo tee /etc/systemd/system/supabase-backup.timer >/dev/null <<'EOF'
[Unit]
Description=Back up Supabase nightly

[Timer]
OnCalendar=*-*-* 03:30
RandomizedDelaySec=30m
Persistent=true

[Install]
WantedBy=timers.target
EOF
sudo systemctl daemon-reload
sudo systemctl enable --now supabase-backup.timer
sudo systemctl start supabase-backup.service
journalctl -u supabase-backup.service -n 1 --no-pager -o cat
ls ~/backups/$(date +%F)
The first run fetches the CLI's Postgres image and takes a minute. Expect
Backed up to /home/exedev/backups/…, then data.sql, roles.sql, and
schema.sql.
Send auth emails through exe.dev
Auth can hand each email to a database function, its send email hook. This one posts it to exe.dev's email gateway, as plain text with a link and a code. The gateway delivers only to you, your team, and people you've shared the VM with.
On the VM, create the function:
cd ~/supabase
url=$(grep '^API_EXTERNAL_URL=' .env | cut -d= -f2-)
sed "s|@AUTH_URL@|$url|" <<'SQL' | docker exec -i supabase-db psql -U postgres -d postgres -v ON_ERROR_STOP=1
create schema exe;
create or replace function exe.send_email(event jsonb) returns jsonb
language plpgsql security definer set search_path = ''
as $$
declare
  d jsonb := event->'email_data';
  link text := '@AUTH_URL@' || '/verify?token=' || (d->>'token_hash')
    || '&type=' || (d->>'email_action_type')
    || '&redirect_to=' || coalesce(d->>'redirect_to', '');
begin
  perform net.http_post(
    url := 'http://169.254.169.254/gateway/email/send',
    body := jsonb_build_object(
      'to', event->'user'->>'email',
      'subject', case d->>'email_action_type'
        when 'signup' then 'Confirm your sign-up'
        when 'magiclink' then 'Your sign-in link'
        when 'recovery' then 'Reset your password'
        when 'invite' then 'You have been invited'
        else 'Your verification code' end,
      'body', 'Open this link to continue:' || chr(10) || link
        || chr(10) || chr(10) || 'Or enter this code: ' || (d->>'token')));
  return '{}'::jsonb;
end
$$;
revoke all on function exe.send_email from public, anon, authenticated;
grant usage on schema exe to supabase_auth_admin;
grant execute on function exe.send_email to supabase_auth_admin;
SQL
Then turn the hook on. Add these lines to the services: section of
~/supabase/docker-compose.override.yml, after the studio: block:
  # Auth emails through exe.dev's email gateway.
  auth:
    environment:
      GOTRUE_HOOK_SEND_EMAIL_ENABLED: "true"
      GOTRUE_HOOK_SEND_EMAIL_URI: pg-functions://postgres/exe/send_email
and run cd ~/supabase && sh run.sh start. Sign up with your exe.dev
email address to try it. Auth reports success even when the gateway
refuses an address; see what the gateway said with:
docker exec supabase-db psql -U postgres -c "select created, status_code, content from net._http_response order by id desc limit 5"
To switch to SMTP later, remove the auth: lines and run sh run.sh start.
Store files in S3
Create the bucket and an access key with your provider. On the VM, back up the files you already have; they don't move by themselves:
~/bin/supabase-backup
Put the bucket's details in ~/supabase/.env. REGION also becomes the
region of Supabase's own S3 endpoint:
cd ~/supabase
sed -i -e 's|^GLOBAL_S3_BUCKET=.*|GLOBAL_S3_BUCKET=your-bucket|' \
  -e 's|^REGION=.*|REGION=your-region|' .env
cat >> .env <<'EOF'
STORAGE_S3_ENDPOINT=https://your-endpoint
STORAGE_S3_KEY_ID=your-access-key-id
STORAGE_S3_SECRET=your-secret-access-key
EOF
Add these lines to the services: section of
docker-compose.override.yml, after the studio: block:
  # Uploaded files in an S3 bucket.
  storage:
    environment:
      STORAGE_BACKEND: s3
      GLOBAL_S3_ENDPOINT: ${STORAGE_S3_ENDPOINT}
      GLOBAL_S3_FORCE_PATH_STYLE: "true"
      AWS_ACCESS_KEY_ID: ${STORAGE_S3_KEY_ID}
      AWS_SECRET_ACCESS_KEY: ${STORAGE_S3_SECRET}
Then restart, tell rclone the new region, and upload the files:
cd ~/supabase
sh run.sh start
rclone config update supabase region=$(grep '^REGION=' .env | cut -d= -f2-) >/dev/null
HTTP_PROXY=http://localhost:8000 rclone copy --ignore-times ~/backups/storage supabase:
For Amazon S3, leave out the two endpoint lines and
GLOBAL_S3_FORCE_PATH_STYLE; see Supabase's
S3 guide.
Move a Cloud project
Install Supabase on the VM first. Then, in the Cloud dashboard:
- Connect: copy the Session pooler connection string. The direct connection is IPv6-only, which exe.dev VMs can't reach.
- Storage → S3 Configuration → Access keys: create a key pair, and note the endpoint and region.
On the VM, dump the Cloud database as Supabase's restore guide does:
read -rs CLOUD_DB && export CLOUD_DB    # paste the session pooler string, with your password
mkdir -p ~/cloud && cd ~/cloud
supabase db dump --remote "$CLOUD_DB" -f roles.sql --role-only
supabase db dump --remote "$CLOUD_DB" -f schema.sql
supabase db dump --remote "$CLOUD_DB" -f data.sql --use-copy --data-only
Load it in one transaction, as supabase_admin, since postgres can't
write to some Storage tables here:
cd ~/cloud
{ cat roles.sql schema.sql; echo 'SET session_replication_role = replica;'; cat data.sql; } |
  docker exec -i supabase-db psql --single-transaction -v ON_ERROR_STOP=1 -U supabase_admin -d postgres -q >/dev/null
echo "exit $?"
Expect exit 0. If it stops on a table or column the VM doesn't have
yet, comment out that COPY line and its \. line in data.sql and run
it again.
Then copy every bucket's files (the VM's supabase remote comes with
the backups):
rclone config create cloud s3 provider=Other \
  endpoint=https://your-project-ref.supabase.co/storage/v1/s3 \
  region=your-region access_key_id=your-key-id secret_access_key=your-secret >/dev/null
rclone lsd cloud:
for bucket in $(rclone lsf cloud: | tr -d '/'); do
  HTTP_PROXY=http://localhost:8000 rclone copy --ignore-times "cloud:$bucket" "supabase:$bucket"
done
--ignore-times matters: the restored database already lists the files,
so rclone would skip them.
Check the tables, users, and files in Studio, then point your app at
https://<vm>.exe.xyz with the VM's keys. Add
https://<vm>.exe.xyz/auth/v1/callback to each OAuth provider's redirect
URLs, and put its keys in the override, as
Migrate from Lovable does for Google. Edge
functions go in ~/supabase/volumes/functions/<name>/index.ts. When it
all works, rm -rf ~/cloud and delete the Cloud S3 key.
Restore a backup
A restore starts the database and files over, then loads a backup. Keys don't change, so apps carry on. On the VM, set the current data aside:
b=~/backups/2026-11-16    # the night to restore
cd ~/supabase
sh run.sh stop
sudo mv volumes/db/data ~/db-before-restore
sudo mv volumes/storage ~/storage-before-restore
mkdir volumes/storage
sh run.sh start
Load the backup into the fresh database, then put back the files (the latest copy):
cd "$b"
{ cat roles.sql schema.sql; echo 'SET session_replication_role = replica;'; cat data.sql; } |
  docker exec -i supabase-db psql --single-transaction -v ON_ERROR_STOP=1 -U supabase_admin -d postgres -q >/dev/null
echo "exit $?"
HTTP_PROXY=http://localhost:8000 rclone copy --ignore-times ~/backups/storage supabase:
Expect exit 0. Once Studio looks right,
sudo rm -rf ~/db-before-restore ~/storage-before-restore.
On a new VM, copy the backup over and install through Download
Supabase. Copy the backup's .env and docker-compose.override.yml
into ~/supabase, run Point it at your VM's address, then Start
Supabase and Set up nightly backups. Then load the backup with the
two commands above. The old keys keep working.
Update Supabase
Supabase's update.sh moves to the latest release, merging its changes
into docker-compose.yml and .env and leaving your values, the
override, and your data alone. It doesn't back up data, so back up first,
and read ~/supabase/CHANGELOG.md after the dry run:
cd ~/supabase
~/bin/supabase-backup
sh update.sh --dry-run
sh update.sh
sh run.sh pull && sh run.sh recreate
docker ps --format '{{.Names}}: {{.Status}}' | sort
Every container should come back healthy. Update the CLI the way you installed it, from its releases.
Troubleshooting
- A container isn't healthy: in
~/supabase,sh run.sh status, thensh run.sh logs auth(orrest,storage, ...). Error sending confirmation email: see Auth emails.Could not find the table, still:docker exec supabase-db psql -U postgres -c "notify pgrst, 'reload schema'".- A browser app gets a login page or a CORS error: the VM is still
private;
ssh exe.dev share set-public my-supabase. - rclone says
SignatureDoesNotMatch: use the endpointhttp://<vm>.exe.xyz/storage/v1/s3withHTTP_PROXY=http://localhost:8000. - Disk full:
du -sh ~/backups ~/supabase/volumes;docker image prune -fclears old images; orssh exe.dev resize.
Frequently asked questions#
Is self-hosted Supabase the same as Supabase Cloud?
Same open-source services and client libraries, so supabase-js code works unchanged. You give up the platform around them: one project per install, and no branching, point-in-time recovery, or read replicas. See What you give up.
How big a VM do I need?
The stack idles at about 1.5 GB of memory, so the default VM is plenty for a small app. Images take about 12 GB of disk; Supabase asks for 40 GB to leave room for data and backups.
Can I keep the API private?
Yes, that's the default; code on the VM uses http://localhost:8000. Make it public only when browsers or servers elsewhere need it. Studio stays private either way.
How do I move my project from Supabase Cloud?
Dump the database with the Supabase CLI, load it on the VM, and copy files with rclone; see Move a Cloud project. From Lovable, use Migrate from Lovable.
How much does it cost?
Supabase is free and open source (Apache 2.0). You pay for your exe.dev plan, with no per-project fees or row limits.
Updated Nov 16, 2026 · tested end to end Nov 16, 2026 · Markdown · manifest.json · Something wrong? Tell us