Self-host Temporal
Durable workflows that survive crashes, deploys and reboots, on one VM.
Shelley handles the setup. About 10 minutes.
Prefer a terminal?
curl -fsSL https://exe.dev/deploy/temporal/prompt.txt | ssh exe.dev new --prompt=/dev/stdinTemporal runs your code durably. You write a workflow as an ordinary function in Go, Python, TypeScript, Java or .NET, and Temporal records each step, so a crash, a deploy or a reboot only pauses it: retries, timers that last for days, and waiting on people or other systems come for free. It needs a server, a database and somewhere for your workers to run, which is what a persistent exe.dev VM gives you in one place. Here the server, the Web UI and PostgreSQL run in Docker Compose, the UI sits behind your exe.dev login, a Python worker runs under systemd next to them, and the databases are backed up every night.
What you get#
- Temporal Server 1.32.2, PostgreSQL 16 and the Web UI 2.58.1 in Docker Compose, restarted after a reboot, with every port on localhost only.
- The
temporalCLI 1.10.1 on the VM, and adefaultnamespace that keeps closed workflows for 7 days. - The Web UI at
https://<vm>.exe.xyz/, private behind exe.dev login. - A Python worker for the
demotask queue in~/temporal-worker, run by systemd, and onePipelineworkflow completed through it. - Nightly backups of both databases to
~/temporal/backups, one restored and checked.
What's running, and where
https://my-temporal.exe.xyz/
The Temporal Web UI, behind exe.dev login
https://my-temporal.exe.xyz:7243/
The HTTP API, for programs that send an exe.dev VM token
localhost:7233
The gRPC frontend for workers and the CLI on the VM (or over SSH or Tailscale)
Deploy with Shelley#
Click Deploy and Shelley will set up Temporal on a new VM, then check that it works. No config-file wrangling required.
Prefer a terminal?
curl -fsSL \
  https://exe.dev/deploy/temporal/prompt.txt \
  | ssh exe.dev new --prompt=/dev/stdin
What Shelley is told
Set up Temporal on this VM by following the exe.dev recipe at https://exe.dev/deploy/temporal.md?via=deploy from top to bottom.

The recipe's example VM name is my-temporal. This VM's name is the output of `hostname`: use it wherever the recipe writes my-temporal. Skip the step that creates the VM; you are on it.

You are done when all of these are true. Check each one yourself:
- Temporal Server 1.32.2, PostgreSQL 16 and the Web UI 2.58.1 in Docker Compose, restarted after a reboot, with every port on localhost only.
- The `temporal` CLI 1.10.1 on the VM, and a `default` namespace that keeps closed workflows for 7 days.
- The Web UI at `https://<vm>.exe.xyz/`, private behind exe.dev login.
- A Python worker for the `demo` task queue in `~/temporal-worker`, run by systemd, and one `Pipeline` workflow completed through it.
- Nightly backups of both databases to `~/temporal/backups`, one restored and checked.

Read the whole recipe, including the closed details. For initial setup,
follow "Install by hand" from top to bottom, skipping VM creation:
Docker, the CLI, the Compose project, the namespace, the worker and its
check, the backup timer, and the restore test. The walkthrough sections
are for the owner afterwards: don't stop the worker, run the Summarize
workflow, set up Tailscale or the dev server, or run the Restore or
Update instructions during initial setup. Never overwrite an existing
~/temporal/.env. Leave the VM private and do not reboot. Don't paste the
PostgreSQL password into the chat. Finish with https://<vm>.exe.xyz/
and the steps in "Watch a workflow survive a crash".

Finish with the URLs I should open.
Also at /deploy/temporal/prompt.txt. The recipe it follows is /deploy/temporal.md.
Open the Web UI#
When Shelley finishes, open https://my-temporal.exe.xyz/ and sign in to
exe.dev. That's the Temporal Web UI, served from port 8000 on the VM;
exe.dev's HTTPS proxy adds TLS and lets only you in. Under
Workflows you'll see the Pipeline run that setup used to check the
worker.
Everything else talks to Temporal over gRPC on localhost:7233, including
the temporal CLI on the VM. On your computer:
ssh my-temporal.exe.xyz temporal workflow list
Watch a workflow survive a crash#
The demo worker in ~/temporal-worker/worker.py
(source) has a Pipeline
workflow: each step is an activity that fails on its first two attempts,
then a 30-second durable timer. Start one with three steps, then kill the
worker partway through. On the VM:
temporal workflow start --task-queue demo --type Pipeline --workflow-id pipeline-1 --input 3
sleep 15; sudo systemctl stop temporal-worker
In the UI, open pipeline-1. Step 1 is done after two retries, and the
timer is running with no worker at all. Wait a minute, so the timer fires
while nothing is there to handle it. Then restart the server too, for good
measure, and bring the worker back:
(cd ~/temporal && docker compose restart temporal)
sudo systemctl start temporal-worker
temporal workflow result -w pipeline-1
The worker picks up where the workflow was: it replays the recorded
history, skips the work already done, and runs steps 2 and 3. The result
is three lines, each succeeded on attempt 3. We did the same with a
reboot of the VM in the middle of a run, and it finished once the VM was
back.
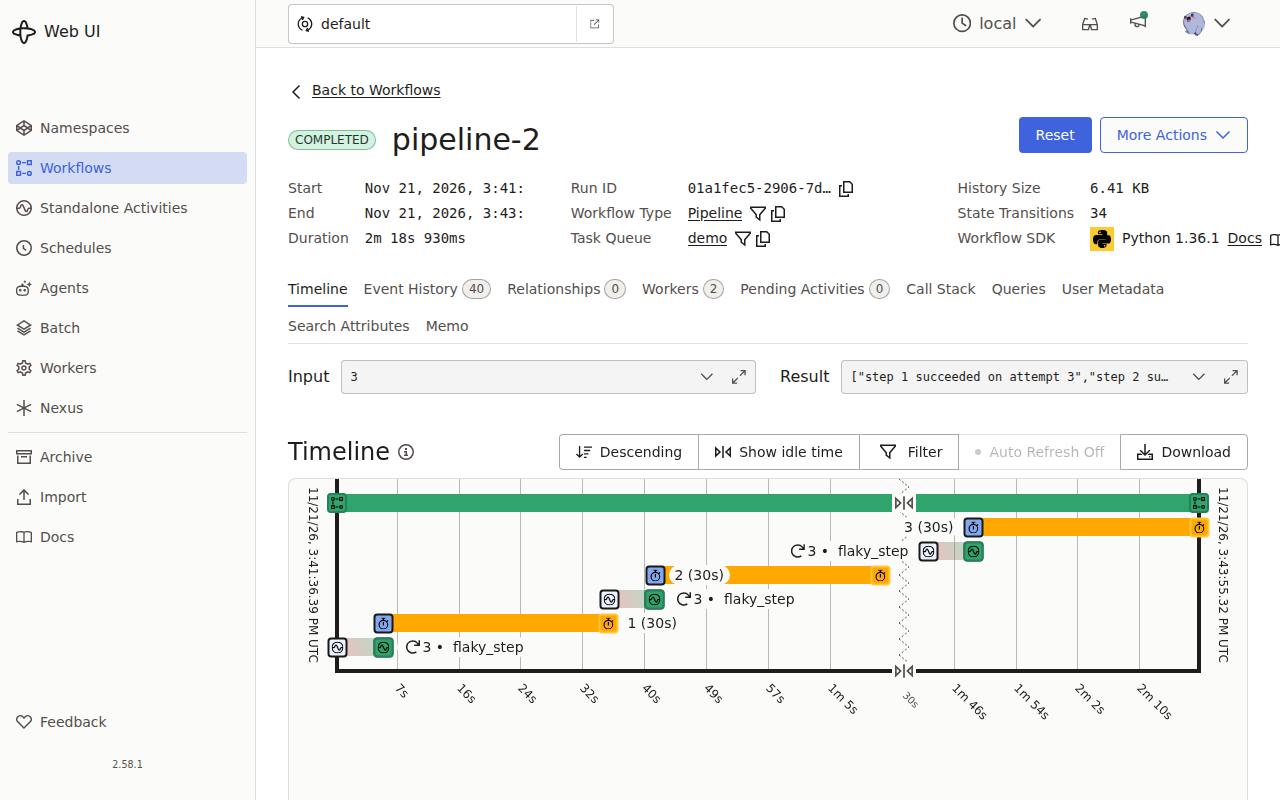
That's the whole idea: the state of a workflow lives in Temporal's database, not in the worker's memory, so workers are disposable. Restart them for a deploy whenever you like.
Call an LLM from a workflow#
Model calls fail, time out and get rate-limited, which is what activities
and retry policies are for. The demo worker's Summarize workflow asks a
model through exe.dev's LLM gateway, which
speaks the OpenAI API at https://llm.int.exe.xyz/v1 and needs no API key
on the VM. On the VM:
temporal workflow execute --task-queue demo --type Summarize --workflow-id summary-1 \
  --input '"Temporal is a durable execution platform. Workflows are written as ordinary code, and Temporal records every step so that a crash, deploy or outage only pauses them."'
The result comes back as one sentence a few seconds later. Change the
model with LLM_MODEL in the worker's environment;
curl -s https://llm.int.exe.xyz/v1/models lists what the gateway offers.
The same pattern scales up to agents: each tool call or model call is an
activity, and the loop is the workflow, so an agent that's been running for
an hour doesn't start over when its process dies. Temporal's
AI cookbook has worked examples.
Write your own worker#
A worker is any program that connects to localhost:7233, registers
workflows and activities, and polls a task queue. Copy the demo's layout:
a directory with your code, uv for dependencies, and a systemd unit
like temporal-worker.service (in Install by hand) so it
starts at boot and restarts when it crashes. The SDKs:
- Python:
uv add temporalio; see the Python guide and samples. - Go: Go is preinstalled on exe.dev VMs;
go get go.temporal.io/sdkand the Go guide. The Go page covers building and running a Go service. - TypeScript: install Node.js as on the Node.js page,
then
npm install @temporalio/client @temporalio/worker @temporalio/workflow @temporalio/activity; see the TypeScript guide.
Shelley, the agent on your VM at https://my-temporal.shelley.exe.xyz/,
can write and run a worker for you: ask it for "a Temporal workflow that
checks my sites every hour and emails me when one is down", and it has the
server, the CLI and the worker unit to start from.
Start workflows from anywhere#
The server also serves Temporal's HTTP API on port 7243, which goes through exe.dev's proxy like any website. It's private: programs send an exe.dev VM token. On your computer, make one:
ssh exe.dev ssh-key generate-api-key --vm=my-temporal --label=temporal --exp=90d
Save it as EXE_TOKEN, then start a workflow, from your laptop, a CI job,
or a webhook handler somewhere else:
curl -sS https://my-temporal.exe.xyz:7243/api/v1/namespaces/default/workflows/summary-2 \
  -H "X-Exedev-Authorization: Bearer $EXE_TOKEN" -H 'Content-Type: application/json' \
  -d '{"workflowType":{"name":"Summarize"},"taskQueue":{"name":"demo"},"input":["Durable execution means your code survives failures."]}'
Expect "started":true. Inputs and results are plain JSON here. Read the
status with a GET on the same URL, and the result from the close event:
curl -sS "https://my-temporal.exe.xyz:7243/api/v1/namespaces/default/workflows/summary-2/history?historyEventFilterType=HISTORY_EVENT_FILTER_TYPE_CLOSE_EVENT" \
  -H "X-Exedev-Authorization: Bearer $EXE_TOKEN"
Signals, queries, updates, cancellation and listing are there too; the
OpenAPI spec
lists every route. From another exe.dev VM, the
VM-to-VM integration keeps the token off
that VM. On your computer, with the calling VM called my-app:
ssh exe.dev integrations add http-proxy --name temporal \
  --target https://my-temporal.exe.xyz:7243/ --peer --attach vm:my-app
my-app then uses https://temporal.int.exe.xyz/api/v1/... with no token.
Workers on other machines#
Workers and SDK clients speak gRPC, which needs HTTP/2 end to end, and
exe.dev's proxy doesn't carry it: we tried, and a gRPC call to
my-temporal.exe.xyz:7233 with a valid token gets 502 Bad Gateway. So
port 7233 stays on localhost, and there are two ways to reach it from
elsewhere.
An SSH tunnel, for a worker on your laptop while you develop. On your computer, leave this running:
ssh -N -L 7233:localhost:7233 my-temporal.exe.xyz
Your worker connects to localhost:7233 as if the server were local.
Tailscale, for workers on other VMs or servers. It's preinstalled. On the Temporal VM and on each worker machine:
sudo systemctl enable --now tailscaled
sudo tailscale up --hostname=$(hostname)
Open the login URL it prints (or join without one through exe.dev's Tailscale integration). Then, on the Temporal VM, forward port 7233 on its tailnet address to the server:
sudo tailscale serve --bg --tcp 7233 tcp://localhost:7233
Workers connect to my-temporal:7233; the demo worker takes
TEMPORAL_ADDRESS=my-temporal:7233. Temporal has no authentication of its
own here, so every device on your tailnet that can reach that port can do
anything; limit it with Tailscale's access rules.
Namespaces and retention#
A namespace keeps workflows apart, and its retention decides how long
closed workflows stay in the database. Setup made default with 7 days.
On the VM, add one per app or environment:
temporal operator namespace create --namespace billing --retention 30d
temporal operator namespace update --namespace default --retention 3d
temporal operator namespace list
Workers and clients pick a namespace when they connect (the demo reads
TEMPORAL_NAMESPACE). Running workflows are kept however long they run;
retention starts when one closes.
The lighter option: the dev server#
temporal server start-dev is the whole server, the UI and a SQLite
database in one process, from the CLI you already have. It needs no
Docker, starts in about a second, and with --db-filename its state
survives restarts. Temporal says it isn't for production, and it lacks the
tooling PostgreSQL has, but for a personal VM it's a fine choice. It
uses the same ports as the Compose setup, so run one or the other: stop
the Compose project first with cd ~/temporal && docker compose down.
Then, on the VM:
mkdir -p ~/temporal-dev
sudo tee /etc/systemd/system/temporal-dev.service >/dev/null <<EOF
[Unit]
Description=Temporal dev server (SQLite)
After=network-online.target
Wants=network-online.target

[Service]
User=$USER
ExecStart=/usr/local/bin/temporal server start-dev --db-filename $HOME/temporal-dev/temporal.db --ui-port 8233 --http-port 7243 --log-level warn
Restart=always
RestartSec=5

[Install]
WantedBy=multi-user.target
EOF
sudo systemctl daemon-reload
sudo systemctl enable --now temporal-dev
sleep 3; temporal operator namespace update --namespace default --retention 7d
The UI is then at https://my-temporal.exe.xyz:8233/, the HTTP API on
7243 and gRPC on 7233, all on localhost. The default namespace starts
with 1 day of retention, hence the last line. Back it up while it runs
with sqlite3 ~/temporal-dev/temporal.db ".backup $HOME/temporal-dev/backup.db".
We ran a workflow across a restart of this service and it finished.
Keep your data#
Every night, ~/temporal/backup.sh
(source) dumps both
databases with pg_dump into a dated directory in ~/temporal/backups,
with copies of .env and the dynamic config, and keeps the newest 14. A
backup on the same disk won't survive losing the VM, so copy them off. On
your computer:
rsync -av my-temporal.exe.xyz:temporal/backups/ temporal-backups/
The .env file in each backup holds the PostgreSQL password; keep the
copies private. exe.dev can also back up the whole VM disk to your own S3
bucket with VM backups. Restoring takes you back to
the moment of the backup: workflows started after it are gone, and timers
that came due in between fire when the server comes back.
Your worker code is the other half. Keep it in Git, for example with the GitHub integration.
The nuts and bolts#
Happy clicking Deploy? You can stop here. These are the same setup steps Shelley follows, plus the maintenance commands for later.
Install by hand
Create a VM#
On your computer (pick another name if my-temporal is taken):
ssh exe.dev new --name=my-temporal
ssh my-temporal.exe.xyz
All remaining commands run on the VM, as exedev.
Install the Temporal CLI#
Docker is socket-activated on a new VM; enable it so the containers come back after a reboot. Then install the CLI from Temporal's GitHub release:
sudo systemctl enable --now docker.service
curl -fsSL "https://github.com/temporalio/cli/releases/download/v1.10.1/temporal_cli_1.10.1_linux_$(dpkg --print-architecture).tar.gz" | sudo tar xz --no-same-owner -C /usr/local/bin temporal
temporal --version
Expect temporal version 1.10.1 (Server 1.32.2, UI 2.56.4).
Start Temporal#
The Compose file (compose.yaml)
is Temporal's PostgreSQL example
with the data on the VM's disk, a generated password, and every port on
127.0.0.1. Its schema service creates the two databases and brings
their schemas up to date, then exits; it runs again on every upgrade.
dynamic.yaml is the
server's dynamic config, reread every minute.
mkdir -p ~/temporal/dynamicconfig && cd ~/temporal
curl -fsSL -o compose.yaml https://exe.dev/deploy/temporal/compose.yaml
curl -fsSL -o dynamicconfig/dynamic.yaml https://exe.dev/deploy/temporal/dynamic.yaml
curl -fsSL -o backup.sh https://exe.dev/deploy/temporal/backup.sh && chmod +x backup.sh
[ -e .env ] || (umask 077; printf 'TEMPORAL_VERSION=1.32.2\nTEMPORAL_UI_VERSION=2.58.1\nPOSTGRES_PASSWORD=%s\n' "$(openssl rand -hex 24)" > .env)
docker compose up -d
timeout 180 sh -c 'until temporal operator cluster health >/dev/null 2>&1; do sleep 2; done'
temporal operator cluster health
The first start pulls about 1.4 GB of images; after that it takes 15
seconds. Expect SERVING. Then create the default namespace with 7
days of retention, and check the UI and the ports:
temporal operator namespace describe --namespace default >/dev/null 2>&1 ||
  temporal operator namespace create --namespace default --retention 7d
curl -s -o /dev/null -w '%{http_code}\n' http://localhost:8000/
ss -ltn | grep -E ':(7233|7243|8000) '
Expect 200, then ports 7233, 7243 and 8000 on 127.0.0.1 only.
Run the demo worker#
The worker (worker.py) uses
Temporal's Python SDK, installed with uv:
mkdir -p ~/temporal-worker && cd ~/temporal-worker
curl -fsSL -o worker.py https://exe.dev/deploy/temporal/worker.py
[ -e pyproject.toml ] || uv init --bare --name temporal-worker -q
uv add -q 'temporalio==1.36.1' openai
Run it with systemd, so it starts at boot and restarts if it crashes:
sudo tee /etc/systemd/system/temporal-worker.service >/dev/null <<EOF
[Unit]
Description=Temporal worker (task queue demo)
After=network-online.target docker.service
Wants=network-online.target

[Service]
User=$USER
WorkingDirectory=$HOME/temporal-worker
ExecStart=$(command -v uv) run --frozen worker.py
Restart=always
RestartSec=5

[Install]
WantedBy=multi-user.target
EOF
sudo systemctl daemon-reload
sudo systemctl enable --now temporal-worker
sleep 5; journalctl -u temporal-worker -n 3 --no-pager
Expect worker polling task queue 'demo'. Run a one-step pipeline, which
takes about 40 seconds:
temporal workflow execute --task-queue demo --type Pipeline --workflow-id setup-check --input 1
Expect Status COMPLETED and ["step 1 succeeded on attempt 3"].
Set up nightly backups#
sudo tee /etc/systemd/system/temporal-backup.service >/dev/null <<EOF
[Unit]
Description=Back up Temporal to ~/temporal/backups
After=docker.service

[Service]
Type=oneshot
User=$USER
ExecStart=$HOME/temporal/backup.sh
EOF
sudo tee /etc/systemd/system/temporal-backup.timer >/dev/null <<'EOF'
[Unit]
Description=Back up Temporal every night

[Timer]
OnCalendar=*-*-* 03:30:00
RandomizedDelaySec=30m
Persistent=true

[Install]
WantedBy=timers.target
EOF
sudo systemctl daemon-reload
sudo systemctl enable --now temporal-backup.timer
sudo systemctl start temporal-backup.service
systemctl list-timers temporal-backup.timer
ls -lA ~/temporal/backups/*/
Expect a next run time and one directory with temporal.dump,
temporal_visibility.dump, .env and dynamic.yaml. For failures:
journalctl -u temporal-backup.service.
Test a backup#
Restore the newest dump of the main database into a scratch database and compare it with the live one:
cd ~/temporal
latest=$(ls -1d backups/2*/ | tail -n 1)
docker compose exec -T postgresql createdb -U temporal restore_check
docker compose exec -T postgresql pg_restore -U temporal -d restore_check --no-owner < "${latest}temporal.dump"
for db in temporal restore_check; do docker compose exec -T postgresql psql -U temporal -tAc 'SELECT count(*) FROM executions' $db; done
docker compose exec -T postgresql dropdb -U temporal restore_check
Expect the same number twice. Installation done; continue with Open the Web UI.
Back up and restore
On the VM, ~/temporal/backup.sh takes an extra backup and prints its
directory.
Restore on the same VM#
Stop the worker and the server, replace both databases with a backup, and start again. On the VM:
cd ~/temporal
b=backups/20261121-033012     # the backup to restore
sudo systemctl stop temporal-worker
docker compose stop temporal ui
for db in temporal temporal_visibility; do
  docker compose exec -T postgresql dropdb -U temporal --if-exists $db
  docker compose exec -T postgresql createdb -U temporal $db
  docker compose exec -T postgresql pg_restore -U temporal -d $db --no-owner < $b/$db.dump
done
docker compose up -d
sudo systemctl start temporal-worker
temporal workflow list
The two dumps are taken one after the other, so the workflow list (the visibility database) can lag the workflows themselves by a moment.
Restore on a new VM#
On a new VM, follow Install by hand through "Install the Temporal CLI". Copy a backup over; on your computer:
scp -r temporal-backups/20261121-033012 my-temporal.exe.xyz:
On the VM, put its .env in place before the first start, so PostgreSQL
gets the same password and Compose the same versions, and start only
PostgreSQL:
mkdir -p ~/temporal/dynamicconfig && cd ~/temporal
curl -fsSL -o compose.yaml https://exe.dev/deploy/temporal/compose.yaml
curl -fsSL -o backup.sh https://exe.dev/deploy/temporal/backup.sh && chmod +x backup.sh
cp ~/20261121-033012/.env . && chmod 600 .env
cp ~/20261121-033012/dynamic.yaml dynamicconfig/
docker compose up -d --wait postgresql
for db in temporal temporal_visibility; do
  docker compose exec -T postgresql createdb -U temporal $db
  docker compose exec -T postgresql pg_restore -U temporal -d $db --no-owner < ~/20261121-033012/$db.dump
done
docker compose up -d
Then carry on from "Run the demo worker" (with your own workers instead) and "Set up nightly backups".
Update Temporal
The versions live in ~/temporal/.env. Temporal supports upgrading
one minor version at a time,
each to its latest patch: 1.32.x to 1.33.x, never 1.32 to 1.34 in one go.
Read the release notes
for each one. On the VM, back up first, then change the version and
restart:
cd ~/temporal
./backup.sh
sed -i 's/^TEMPORAL_VERSION=.*/TEMPORAL_VERSION=1.33.0/' .env
docker compose pull
docker compose up -d
docker compose logs schema | tail -n 3
temporal operator cluster system
The schema service runs again with the new admin tools and applies any
schema changes before the server starts. Expect UpdateSchemaTask done
and the new ServerVersion. Running workflows carry on: we upgraded from
1.31.5 to 1.32.2 with a workflow mid-timer, and it completed. Update the
UI the same way with TEMPORAL_UI_VERSION, and the CLI by rerunning its
install command with the new version. Keep the SDK in your workers
current too: uv add temporalio==<version> in ~/temporal-worker, then
sudo systemctl restart temporal-worker.
Something not working?
On the VM, these show what each part is doing:
cd ~/temporal && docker compose ps -a
docker compose logs --tail 50 temporal
docker compose logs schema | grep -iE 'error|fail'
journalctl -u temporal-worker -n 50 --no-pager
temporalanduinever start,schemaexited with an error: the schema step couldn't reach or log in to PostgreSQL. Checkdocker compose logs postgresql; a password in.envthat doesn't match the one the data directory was created with is the usual cause.- The UI says it can't reach the server: the server is still starting
or has stopped.
docker compose logs temporalsays why. - A workflow sits at "Running" and nothing happens: no worker polls its
task queue. The Workers tab on the workflow shows who's polling;
check the task queue name, the namespace, and
systemctl status temporal-worker. - The UI shows "Workflow Task Failed" over and over: the workflow code threw an error or did something non-deterministic (a random number, the clock, network I/O outside an activity). The event history shows the stack trace; fix the code and restart the worker, and the workflow retries the task.
502connecting a worker tomy-temporal.exe.xyz:7233: that's gRPC through the HTTPS proxy, which doesn't work. Use an SSH tunnel or Tailscale, as in Workers on other machines.401frommy-temporal.exe.xyz:7243: exe.dev wants a login or a token. Check theX-Exedev-Authorizationheader, and that the token was made with--vm=my-temporaland hasn't expired.- Disk filling up:
sudo du -sh ~/temporal/postgres ~/temporal/backups. Lower the namespaces' retention, keep fewer backups (keepinbackup.sh), or grow the disk withssh exe.dev resize my-temporal --disk=50GB.
Frequently asked questions#
How much does it cost to self-host Temporal on exe.dev?
Temporal's server, UI and SDKs are free and open source under the MIT license. You pay for your exe.dev plan. The server, PostgreSQL and the UI used about 160 MB of memory at rest on our 2-CPU, 8 GB test VM, and the images take about 1.4 GB of disk, so a new VM's 25 GB goes a long way. Long histories and long retention are what grow the database.
Can workers on my laptop or another server connect to it?
Not through exe.dev's HTTPS proxy: SDKs and workers speak gRPC, and the proxy answers gRPC on port 7233 with 502. Run workers on the same VM, or reach port 7233 through an SSH tunnel or a Tailscale network, as in Workers on other machines. Programs that only start, signal or query workflows can use the HTTP API through the proxy with a VM token.
Does the Web UI have its own login?
No. Out of the box Temporal has no users: anyone who reaches the UI can see every workflow and start, signal, cancel or reset them. Here exe.dev's proxy is the lock, so only you and the people you share the VM with get in. The UI doesn't read exe.dev's identity headers; if you need per-person permissions, set up Temporal's OIDC and authorizer.
Should I use the dev server or Docker Compose?
Compose with PostgreSQL is what this page installs: the production-shaped setup, with a database you can back up, inspect and upgrade the way Temporal documents. temporal server start-dev with a SQLite file is one process and starts in a second; it's fine for a personal VM or a prototype, and the dev server section runs it under systemd. Temporal says the dev server is not for production.
Do I need Elasticsearch?
No. PostgreSQL 12 and later handle Temporal's advanced visibility themselves: listing and filtering workflows in the UI, the CLI's --query, and custom search attributes. Elasticsearch helps at a scale one VM doesn't reach.
Why not Temporal Cloud?
Temporal Cloud runs the server for you across regions, with SLAs, and charges for actions and storage. Self-hosting on a VM is a fixed price with the data on your disk, and a good fit for one team's workers, side projects, and agents that need durable steps. Your workflow code is the same on both: point the client at a different address.
Published Nov 21, 2026 · Updated Nov 21, 2026 · tested end to end Nov 21, 2026 · Markdown · manifest.json · Something wrong? Tell us