Run JupyterLab on your own VM
Private notebooks on a VM that keeps your data. No tokens.
Shelley handles the setup. About 10 minutes.
Prefer a terminal?
curl -fsSL https://exe.dev/deploy/jupyter/prompt.txt | ssh exe.dev new --prompt=/dev/stdinJupyterLab is the notebook most data work starts in: code, tables, and
charts side by side in .ipynb files that anyone can open. Here it runs on
your own exe.dev VM, with a disk that keeps your notebooks, data, and Python
environments between sessions. Your exe.dev login is the sign-in, so there's
no token to copy around.
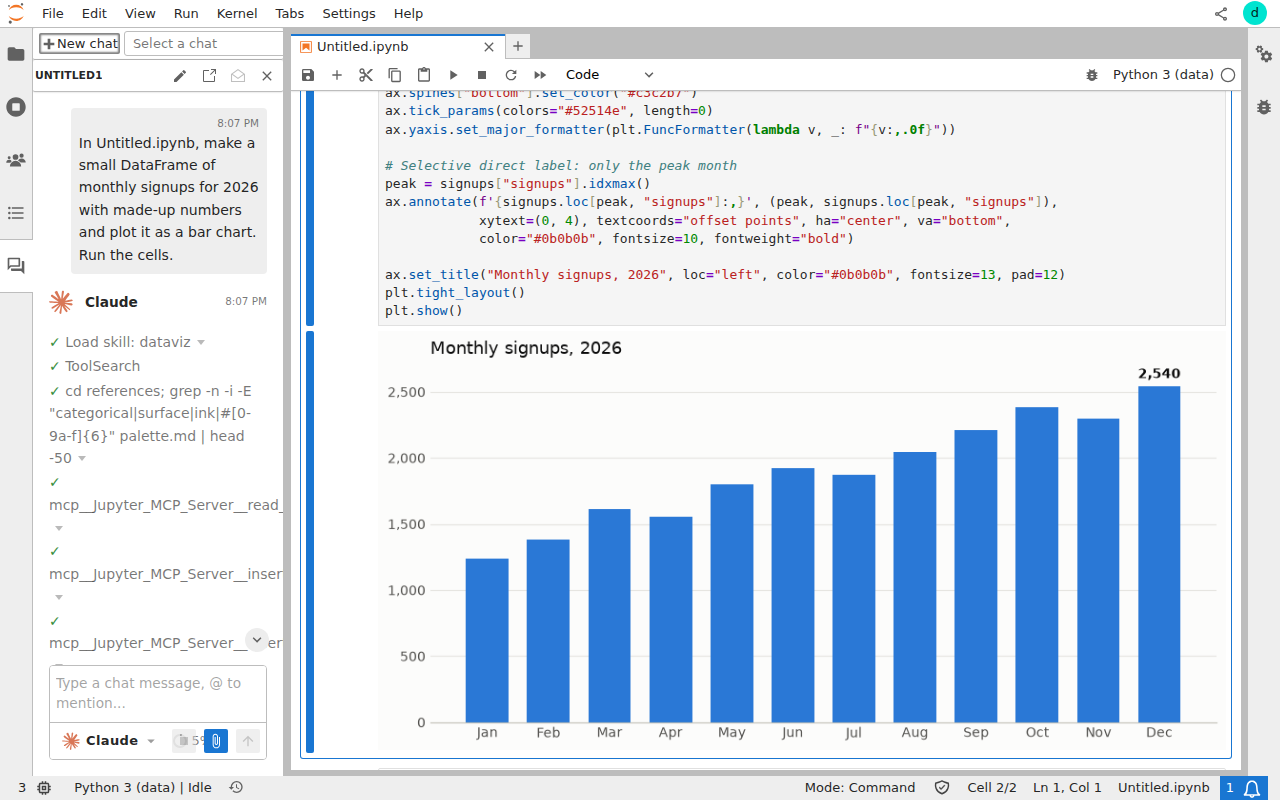
Jupyter AI adds a chat panel where Claude, Codex, or Jupyternaut answer questions and edit and run your notebooks, with models from exe.dev's LLM gateway and no API keys anywhere.
What you get#
- JupyterLab at your VM's private URL, signed in with exe.dev. No token or password.
- A Python 3.13 kernel with pandas and matplotlib, plus a recipe for more environments.
- Claude, Codex, and Jupyternaut in the chat panel; Claude edits and runs your notebooks.
- Model calls from notebooks with the OpenAI SDK, without an API key.
- Real-time collaboration, so edits by agents and teammates show up as they happen.
- Starts again after a reboot; nightly backups of notebooks, chats, and package lists.
What's running, and where
https://my-jupyter.exe.xyz/
JupyterLab, signed in with your exe.dev account
https://my-jupyter.exe.xyz/
Collaborators you share the VM with, editing alongside you
~/envs/data, with pandas and matplotlib; add more environments
Deploy with Shelley#
Click Deploy and Shelley will set up JupyterLab on a new VM, then check that it works. No config-file wrangling required.
Prefer a terminal?
curl -fsSL \
  https://exe.dev/deploy/jupyter/prompt.txt \
  | ssh exe.dev new --prompt=/dev/stdin
When it's done, run this on your computer (only you can):
ssh exe.dev share add my-jupyter teammate@example.comWhat Shelley is told
Set up JupyterLab on this VM by following the exe.dev recipe at https://exe.dev/deploy/jupyter.md from top to bottom.

The recipe's example VM name is my-jupyter. This VM's name is the output of `hostname`: use it wherever the recipe writes my-jupyter. Skip the step that creates the VM; you are on it.

You are done when all of these are true. Check each one yourself:
- JupyterLab at your VM's private URL, signed in with exe.dev. No token or password.
- A Python 3.13 kernel with pandas and matplotlib, plus a recipe for more environments.
- Claude, Codex, and Jupyternaut in the chat panel; Claude edits and runs your notebooks.
- Model calls from notebooks with the OpenAI SDK, without an API key.
- Real-time collaboration, so edits by agents and teammates show up as they happen.
- Starts again after a reboot; nightly backups of notebooks, chats, and package lists.

Read the whole recipe, including the closed details. For initial setup,
follow "Install by hand" first, skipping VM creation and SSH: JupyterLab,
the data kernel, the config, the service, the checks, the AI agents, the
backup timer, and the backup check. Those checks are enough; don't install
extra tools or browsers to test further. The walkthrough at the top is for
the owner afterwards. Do not run Restore, Update, "Add another
environment", or JupyterHub.
Work as exedev. JupyterLab serves port 8000, the VM's main proxy port.
Don't share the VM, and never make it public. Leave Jupyter's token on;
never print it in your reply.
Keep test prompts to a word or two. Delete the check notebook afterwards.
Verify jupyter.service is enabled; do not reboot.
Finish by giving the owner https://<vm>.exe.xyz/.

Finish with the URLs I should open and these commands, which only I can run, from my own computer (with this VM's name in them):
  ssh exe.dev share add my-jupyter teammate@example.com
Also at /deploy/jupyter/prompt.txt. The recipe it follows is /deploy/jupyter.md.
Open JupyterLab#
Open the URL Shelley gives you. It'll look like
https://my-jupyter.exe.xyz/. Sign in to exe.dev if you're asked,
and JupyterLab opens straight away; the initial in the top right corner is
yours.
Click Python 3 (data) in the Launcher for a new notebook. The file
browser on the left shows ~/notebooks on the VM; drag files onto it to
upload data. Notebooks save to the VM's disk, and stay there when you close
the tab. A running kernel keeps its variables until you restart it or the VM
restarts; the Running panel (the square icon on the left) shuts down
kernels you're done with.
Install packages#
The kernel runs in ~/envs/data, a Python 3.13 environment with pandas,
matplotlib, and the OpenAI SDK. Install more from a notebook cell:
%pip install polars duckdb
or from a terminal (File → New → Terminal) on the VM, with uv, which is faster:
uv pip install --python ~/envs/data polars duckdb
Then restart the kernel (Kernel → Restart Kernel). Packages stay
installed on the disk. JupyterLab itself lives in a separate environment,
~/jupyter, so nothing you install in a notebook can break it.
Need a different Python or a project whose packages clash with these? Add another environment; each one shows up in the Launcher as its own kernel.
Ask AI for help#
Open the chat panel (the speech bubbles on the left) and click New chat. Pick who answers in the menu under the message box:
- Claude is Claude Code. It reads your notebooks, writes cells, runs them, and reads the output, like a colleague at the keyboard. Ask it to "load sales.csv in analysis.ipynb and chart revenue by month".
- Codex is OpenAI's coding agent, with the same powers.
- Jupyternaut is a plain chat assistant, good for quick questions.
All three use exe.dev's LLM gateway, so there's no key to paste. Claude and
Codex act on their own, without asking first, and run code as your VM's user;
that's what makes them useful, and it's why the VM should only be shared with
people you trust. Chats are saved as .chat files next to your notebooks.
Notebooks can call models too. The OpenAI SDK finds the gateway by itself:
from openai import OpenAI

reply = OpenAI().responses.create(model="gpt-5.4-mini", input="Name three plot types.")
print(reply.output_text)
The gateway's model list has the
other names. For Claude, pip install anthropic and use Anthropic() the
same way.
Shelley, on your VM's exe.dev page, can work on notebooks too. Ask it to "clean up ~/notebooks/analysis.ipynb", and if you have the notebook open, you watch its changes arrive.
Work with your team#
On your computer, share the VM:
ssh exe.dev share add my-jupyter teammate@example.com
They get an email invitation. Once signed in to exe.dev, they open the same URL and land in the same JupyterLab, signed in as themselves. Open notebooks update live for everyone, with each person's cursor and name shown, and the people icon on the left lists who's there.
Warning
Everyone you share with can run any code on the VM, read every file on it, and use your LLM allocation. Share with people you'd give a shell, and remove them with
ssh exe.dev share remove my-jupyter teammate@example.com.
Never make this VM public with share set-public: anyone with an exe.dev
account could then sign in and run code on it. To show results to people
who shouldn't run code, export a notebook (File → Save and
Export Notebook As → HTML) and send the file.
Separate accounts for each person#
This setup is one workspace for one person or a small trusted group. If each
person needs their own files, and must not see anyone else's, the simplest
answer on exe.dev is a VM each: everyone runs this recipe on their own VM.
JupyterHub is the classic answer for a
larger group on one server, with a Linux account and notebook server per
person; exe.dev's login can sign people in through the same X-ExeDev-Email
header (see Login with exe). It's a bigger setup
than this page covers.
CPU, memory, and disk#
exe.dev VMs have no GPU. The default VM has 2 vCPUs, 8 GB of memory, and a 25 GB disk, which is plenty for pandas, scikit-learn, and plotting on a few million rows. Each kernel keeps its data in memory, so a large DataFrame open in three notebooks costs three times. If a kernel dies while loading data, it ran out of memory: shut down idle kernels, or on your computer, give the VM more room:
ssh exe.dev resize my-jupyter --cpu=4 --memory=16GB
ssh exe.dev resize my-jupyter --disk=50GB
The disk is persistent, so datasets you download stay put. For data that belongs in a database, see Postgres or SQLite.
Keep your notebooks#
Backups run nightly into ~/backups. Each one holds your notebooks, chats,
JupyterLab settings, kernels, and the package list of every environment
(environments are reinstalled from these lists, not copied). Keep a copy
off the VM. On your computer:
scp -r my-jupyter.exe.xyz:backups .
For version history, keep notebooks in a Git repository. With exe.dev's GitHub integration the VM can push and pull without a key on it:
ssh exe.dev integrations add github --name analysis --repository you/analysis --attach vm:my-jupyter
Then, on the VM, cd ~/notebooks && git clone https://github.int.exe.xyz/you/analysis.git.
Something stuck? See Something not working?, or ask Shelley.
The nuts and bolts#
Happy clicking Deploy? You can stop here. These are the same setup steps Shelley follows, plus the maintenance commands for later. We tested them with JupyterLab 4.6.6, Jupyter Server 2.21.1, Jupyter AI 3.2.0, ipykernel 7.4.0, and Python 3.13 on exe.dev's default Ubuntu 24.04 image.
Install by hand
Create a VM#
On your computer (pick another name if my-jupyter is taken):
ssh exe.dev new --name=my-jupyter
ssh my-jupyter.exe.xyz
All remaining installation commands run on the VM, as exedev.
Install JupyterLab#
JupyterLab gets its own environment in ~/jupyter, with Jupyter AI and its
real-time collaboration extra. The version ranges take patch releases but
not new minor versions. uv downloads Python 3.13 if the VM doesn't have it.
mkdir -p ~/notebooks ~/envs ~/.jupyter ~/bin
uv venv --python 3.13 ~/jupyter
uv pip install --python ~/jupyter "jupyterlab>=4.6,<4.7" "jupyter-ai[jupyternaut,rtc]>=3.2,<3.3"
~/jupyter/bin/jupyter --version | grep -E 'jupyterlab|jupyter_server'
Expect jupyterlab : 4.6.x and jupyter_server : 2.x. The environment
is about 600 MB.
Create the data kernel#
Notebooks run in a separate environment, so packages installed from
notebooks never touch JupyterLab. --seed adds pip, so %pip install works
in notebooks.
uv venv --seed --python 3.13 ~/envs/data
uv pip install --python ~/envs/data ipykernel pandas matplotlib openai
~/envs/data/bin/python -m ipykernel install --user --name python3 --display-name "Python 3 (data)"
grep -q JUPYTER_PREFER_ENV_PATH ~/.profile || cat >> ~/.profile <<'EOF'

# Prefer kernels in ~/.local/share/jupyter (see jupyter.service).
export JUPYTER_PREFER_ENV_PATH=0
EOF
The kernel is named python3, Jupyter's default, so it replaces the bare
kernel that comes with JupyterLab's own environment; new notebooks, and
notebooks from elsewhere, use it. Jupyter normally prefers kernels from the
environment it runs in; JUPYTER_PREFER_ENV_PATH=0 makes yours win, both
in the service below and in your shell.
Configure JupyterLab#
JupyterLab listens on port 8000, which exe.dev's proxy serves at
https://<vm>.exe.xyz/ to you and the people you share the VM with. The proxy sends each request with the visitor's
email in the X-ExeDev-Email header, and replaces any such header a browser
sends (see Login with exe). A small identity provider
signs people in from that header. Jupyter's random token stays on for
everything else, such as requests from other programs on the VM.
cat > ~/.jupyter/jupyter_server_config.py <<EOF
# JupyterLab behind exe.dev's HTTPS proxy: https://$(hostname).exe.xyz/
from jupyter_server.auth.identity import IdentityProvider, User

c = get_config()  # noqa: F821
c.ServerApp.ip = "0.0.0.0"
c.ServerApp.port = 8000
c.ServerApp.port_retries = 0
c.ServerApp.open_browser = False
c.ServerApp.root_dir = "$HOME/notebooks"
c.ServerApp.trust_xheaders = True


class ExeDevIdentityProvider(IdentityProvider):
    """Sign in whoever exe.dev's proxy says it is, from X-ExeDev-Email.

    The proxy only lets in people the VM is shared with, and replaces any
    X-ExeDev-Email a browser sends. Requests that don't come through the
    proxy have no header and need Jupyter's token (\`jupyter server list\`).
    """

    def get_user(self, handler):
        email = handler.request.headers.get("X-ExeDev-Email")
        if email:
            return User(username=email, display_name=email.split("@")[0])
        return super().get_user(handler)


c.ServerApp.identity_provider_class = ExeDevIdentityProvider
# Jupyternaut's model on first start; change it later in Jupyternaut Settings.
c.JupyternautExtension.initial_language_model = "openai/gpt-5.4-mini"
EOF
Warning
Keep the VM private. With
share set-public, everyone with an exe.dev account would get the header, and with it a shell on your VM.
Start JupyterLab with systemd#
The service gives JupyterLab, its kernels, and the AI agents the LLM gateway's address. The gateway needs no key; the placeholders only keep SDKs from complaining.
sudo tee /etc/systemd/system/jupyter.service >/dev/null <<EOF
[Unit]
Description=JupyterLab on port 8000
After=network-online.target
Wants=network-online.target

[Service]
User=$USER
WorkingDirectory=$HOME/notebooks
# Notebooks, kernels, and Jupyter AI reach models through exe.dev's
# LLM gateway; the placeholder keys are not secrets.
# Kernels in ~/.local/share/jupyter/kernels win over JupyterLab's own.
Environment=JUPYTER_PREFER_ENV_PATH=0
Environment=OPENAI_BASE_URL=https://llm.int.exe.xyz/v1
Environment=OPENAI_API_KEY=exe-llm-gateway
Environment=ANTHROPIC_BASE_URL=https://llm.int.exe.xyz
Environment=ANTHROPIC_API_KEY=exe-llm-gateway
ExecStart=$HOME/jupyter/bin/jupyter lab
Restart=on-failure
RestartSec=5

[Install]
WantedBy=multi-user.target
EOF
sudo systemctl daemon-reload
sudo systemctl enable --now jupyter.service
until curl -s -o /dev/null http://localhost:8000/api; do sleep 2; done
systemctl is-enabled jupyter.service
curl -fsS http://localhost:8000/api; echo
Jupyter AI makes the first start take 15-30 seconds. Expect enabled and
{"version": "2.21.1"} or newer.
Check sign-in and a kernel#
Without exe.dev's header or the token, JupyterLab refuses API requests and
sends browsers to its login page. Both lines should print 403, then 200
with the token:
curl -s -o /dev/null -w '%{http_code}\n' http://localhost:8000/api/status
curl -s -o /dev/null -w '%{http_code}\n' http://localhost:8000/api/contents
token=$(~/jupyter/bin/jupyter server list --json | jq -r 'select(.port == 8000) | .token')
curl -s -o /dev/null -w '%{http_code}\n' -H "Authorization: token $token" http://localhost:8000/api/status
Now run a notebook in the data kernel, including a call through the gateway:
cd ~/notebooks
~/jupyter/bin/python - <<'EOF'
import nbformat as nbf
nb = nbf.v4.new_notebook()
nb.metadata.kernelspec = {"name": "python3", "display_name": "Python 3 (data)", "language": "python"}
nb.cells = [
    nbf.v4.new_code_cell("import sys, pandas\nprint(sys.prefix, pandas.__version__)"),
    nbf.v4.new_code_cell("from openai import OpenAI\n"
        "r = OpenAI().responses.create(model='gpt-5.4-mini', input='Reply with one word: pong')\n"
        "print(r.output_text)"),
]
nbf.write(nb, "setup-check.ipynb")
EOF
JUPYTER_PREFER_ENV_PATH=0 OPENAI_BASE_URL=https://llm.int.exe.xyz/v1 OPENAI_API_KEY=exe-llm-gateway \
  ~/jupyter/bin/jupyter execute --inplace setup-check.ipynb
jq -r '.cells[].outputs[].text[]' setup-check.ipynb
rm setup-check.ipynb
Expect /home/exedev/envs/data with the pandas version, then pong.
Add Claude and Codex#
Jupyter AI talks to Claude Code and Codex through small adapters from npm,
so the VM needs Node.js. exeuntu configure points both at the gateway.
curl -fsSL https://deb.nodesource.com/setup_26.x | sudo -E bash -
sudo apt-get install -y nodejs
sudo npm install -g @agentclientprotocol/claude-agent-acp @agentclientprotocol/codex-acp
exeuntu configure claude
exeuntu configure codex
sudo systemctl restart jupyter.service
until curl -s -o /dev/null http://localhost:8000/api; do sleep 2; done
command -v claude-agent-acp codex-acp
Expect two paths. The chat panel's menu then lists Claude, Codex, and Jupyternaut. To check one, ask Claude Code itself:
claude -p 'Reply with one word: pong'
Expect pong.
Jupyter AI also starts a small MCP server on 127.0.0.1:3001 that lets the
agents edit and run notebooks. It only listens on the VM itself and
refuses requests that come through exe.dev's proxy.
Set up nightly backups#
The backup copies notebooks, chats, JupyterLab settings, kernel definitions, and Jupyter AI's settings, and writes each environment's package list instead of copying the environments. It keeps the 14 newest.
cat > ~/bin/jupyter-backup <<'EOF'
#!/usr/bin/env bash
# Back up notebooks, chats, Jupyter settings, kernels, and the package
# list of every environment, to ~/backups. Keeps the 14 newest.
set -euo pipefail
umask 077
cd "$HOME"
mkdir -p backups .jupyter/env-lists
# Environments are rebuilt from these lists rather than copied.
uv pip freeze --python jupyter > .jupyter/env-lists/jupyterlab.txt
for env in envs/*/; do
  uv pip freeze --python "$env" > ".jupyter/env-lists/$(basename "$env").txt"
done
out="backups/jupyter-$(date -u +%Y%m%d-%H%M%S).tar.gz"
tar -czf "$out.part" --exclude=.ipynb_checkpoints \
  notebooks .jupyter .local/share/jupyter/kernels .local/share/jupyter/jupyter_ai
mv "$out.part" "$out"
ls -1t backups/jupyter-*.tar.gz | tail -n +15 | xargs -r rm --
echo "$HOME/$out"
EOF
chmod +x ~/bin/jupyter-backup
Schedule it for 03:30 UTC (or so), then take a first backup:
sudo tee /etc/systemd/system/jupyter-backup.service >/dev/null <<EOF
[Unit]
Description=Back up notebooks to ~/backups

[Service]
Type=oneshot
User=$USER
ExecStart=$HOME/bin/jupyter-backup
EOF
sudo tee /etc/systemd/system/jupyter-backup.timer >/dev/null <<'EOF'
[Unit]
Description=Back up notebooks every night

[Timer]
OnCalendar=*-*-* 03:30:00
RandomizedDelaySec=30m
Persistent=true

[Install]
WantedBy=timers.target
EOF
sudo systemctl daemon-reload
sudo systemctl enable --now jupyter-backup.timer
sudo systemctl start jupyter-backup.service
systemctl list-timers jupyter-backup.timer
ls -lh ~/backups
Check that the timer has a next run and the directory has a tarball. For
failures: journalctl -u jupyter-backup.service.
Test a backup#
List the newest backup's contents without unpacking it:
latest=$(ls -1t ~/backups/jupyter-*.tar.gz | head -n 1)
tar -tzf "$latest" | grep -E 'jupyter_server_config.py|env-lists/|kernels/python3/kernel.json'
Expect the config file, env-lists/jupyterlab.txt and env-lists/data.txt,
and the kernel definition.
Installation done. Leave sharing to the owner; continue with Open JupyterLab.
Add another environment
Each environment is a kernel in the Launcher. On the VM, this makes a Python 3.12 environment for machine learning; change the name, Python version, and packages to suit:
uv venv --seed --python 3.12 ~/envs/ml
uv pip install --python ~/envs/ml ipykernel scikit-learn
~/envs/ml/bin/python -m ipykernel install --user --name ml --display-name "Python 3.12 (ml)"
Reload JupyterLab in the browser and Python 3.12 (ml) appears in the
Launcher; switch an open notebook with Kernel → Change Kernel. No
restart is needed. For a project with its own pyproject.toml, use its
.venv the same way: uv add --dev ipykernel in the project, then
.venv/bin/python -m ipykernel install --user --name myproject.
To remove one: ~/jupyter/bin/jupyter kernelspec remove ml, then
rm -rf ~/envs/ml. Other languages work too, through their own Jupyter
kernels, such as IRkernel for R.
Back up and restore
On the VM, ~/bin/jupyter-backup makes an extra backup and prints its
path. Copy backups off the VM as shown in
Keep your notebooks.
Restore#
On a new VM, follow Install by hand up to and including Create the data kernel. Then, on your computer, copy your backup over:
scp jupyter-20261116-033012.tar.gz my-jupyter.exe.xyz:
Use your backup's actual filename here and below. On the VM, stop JupyterLab if it runs, unpack, and reinstall each environment's packages from its list:
sudo systemctl stop jupyter.service 2>/dev/null || true
cd ~ && tar -xzf ~/jupyter-20261116-033012.tar.gz
for list in ~/.jupyter/env-lists/*.txt; do
  name=$(basename "$list" .txt)
  [ "$name" = jupyterlab ] && continue
  [ -d ~/envs/"$name" ] || uv venv --seed --python 3.13 ~/envs/"$name"
  uv pip install --python ~/envs/"$name" -r "$list"
done
An environment made with another Python version, like ml above, needs
uv venv with that version before the loop. Then set up the service, the
agents, and backups as in Install by hand.
The restored config keeps the old VM's name only in a comment, so it works
as is.
Update JupyterLab
On the VM, back up, then upgrade within the same minor versions and restart:
~/bin/jupyter-backup
uv pip install --python ~/jupyter --upgrade "jupyterlab>=4.6,<4.7" "jupyter-ai[jupyternaut,rtc]>=3.2,<3.3"
sudo systemctl restart jupyter.service
until curl -s -o /dev/null http://localhost:8000/api; do sleep 2; done
~/jupyter/bin/jupyter --version | grep -E 'jupyterlab|jupyter_server'
Reload the page with Ctrl+Shift+R (Cmd+Shift+R on a Mac). For a new minor
version, such as JupyterLab 4.7, read the
changelog
and change the version ranges. If something breaks, reinstall the old
versions from ~/.jupyter/env-lists/jupyterlab.txt:
uv pip sync --python ~/jupyter ~/.jupyter/env-lists/jupyterlab.txt.
Kernel environments are yours to update: uv pip install --python ~/envs/data --upgrade pandas, then restart the kernel. The agents update with
sudo npm update -g @agentclientprotocol/claude-agent-acp @agentclientprotocol/codex-acp.
Something not working?
On the VM:
systemctl status jupyter.service
journalctl -u jupyter.service -n 100 --no-pager
- The page doesn't load (502): right after a restart, JupyterLab takes
up to 30 seconds to start. If it never comes, check the proxy still points
at port 8000: on your computer,
ssh exe.dev share port my-jupyter 8000. - JupyterLab asks for a token or password: the request didn't come through
exe.dev's proxy with your login. Open
https://<vm>.exe.xyz/itself, not a link tolocalhostor the VM's IP address. ModuleNotFoundErrorfor a package you installed: the notebook uses another kernel. Check the kernel name in the top right corner, and install into that environment. On the command line,jupyter executeandjupyter nbconvert --executeneedJUPYTER_PREFER_ENV_PATH=0; a login shell has it from~/.profile.- The kernel dies or restarts by itself: it ran out of memory. Check
free -h, shut down idle kernels, or resize the VM (see CPU, memory, and disk). - No Claude or Codex in the chat menu: check
command -v claude-agent-acp codex-acp, then restart JupyterLab. - An agent's answer fails with an authentication error: run
exeuntu configure claudeorexeuntu configure codexagain, then restart JupyterLab. - Jupyternaut answers with an error: open Settings → Jupyternaut Settings and
pick a model from the gateway's model list,
written as
openai/<model>, such asopenai/gpt-5.4-mini. - Disk full: check
df -h /anddu -sh ~/envs/* ~/notebooks; uv's cache can go withuv cache clean.
Frequently asked questions#
Do I need Jupyter's token or a password?
No. exe.dev's proxy only lets in people you've shared the VM with, and tells JupyterLab who they are, so it signs them in. The token is still on for anything that doesn't come through the proxy; on the VM, ~/jupyter/bin/jupyter server list shows it.
Is there a GPU?
No. exe.dev VMs are CPU only. Pandas, scikit-learn, plotting, and small models are fine; training big neural networks isn't. For more memory or cores, ssh exe.dev resize my-jupyter --cpu=4 --memory=16GB.
How much does it cost?
JupyterLab and Jupyter AI are free. You pay for your VM plan, and AI chats and model calls from notebooks use your exe.dev LLM allocation.
Can teammates work in the same notebook?
Yes. Share the VM and they open the same URL; everyone sees each other's edits and cursors live. Their code runs as your VM's user, so only share with people you'd give a shell.
Jupyter or marimo?
Jupyter if you want the standard .ipynb format, its huge ecosystem of extensions and kernels, or notebooks other people will open. marimo if you want reactive notebooks stored as plain Python files.
Can I open these notebooks in VS Code or Cursor?
Yes. Connect with Remote-SSH to my-jupyter.exe.xyz, open ~/notebooks, and pick ~/envs/data/bin/python as the kernel. Or run VS Code in the browser with code-server.
Where are my files, and do they survive a reboot?
On the VM's disk: notebooks in ~/notebooks, environments in ~/envs. They survive restarts, and a nightly backup copies notebooks, chats, and package lists into ~/backups.
Updated Nov 16, 2026 · tested end to end Nov 16, 2026 · Markdown · manifest.json · Something wrong? Tell us