# AWS Workload Identity Federation
Identity Federation lets an attached VM mint short-lived exe.dev OIDC tokens.
AWS trusts those tokens through an IAM OIDC provider, then exchanges them for
temporary role credentials with `AssumeRoleWithWebIdentity`. Use this instead
of storing AWS access keys on the VM.
Create the exe.dev integration in the web UI. Run the AWS commands from a
machine with the AWS CLI.
## Setup
### Set values
One-time AWS account setup values. Choose these once for the AWS account:
```
export AWS_ACCOUNT_ID=123456789012
export AWS_AUDIENCE=sts.amazonaws.com
export AWS_OIDC_PROVIDER_ARN="arn:aws:iam::${AWS_ACCOUNT_ID}:oidc-provider/exe.dev"
```
Per-role and per-exe.dev-integration values. Choose these for each workload:
```
export INTEGRATION_NAME=awswif
export ROLE_NAME=exe-dev-demo
export AWS_ROLE_ARN="arn:aws:iam::${AWS_ACCOUNT_ID}:role/${ROLE_NAME}"
export AWS_TRUST_POLICY_FILE="/tmp/exe-${ROLE_NAME}-trust-policy.json"
```
### Add the exe.dev integration
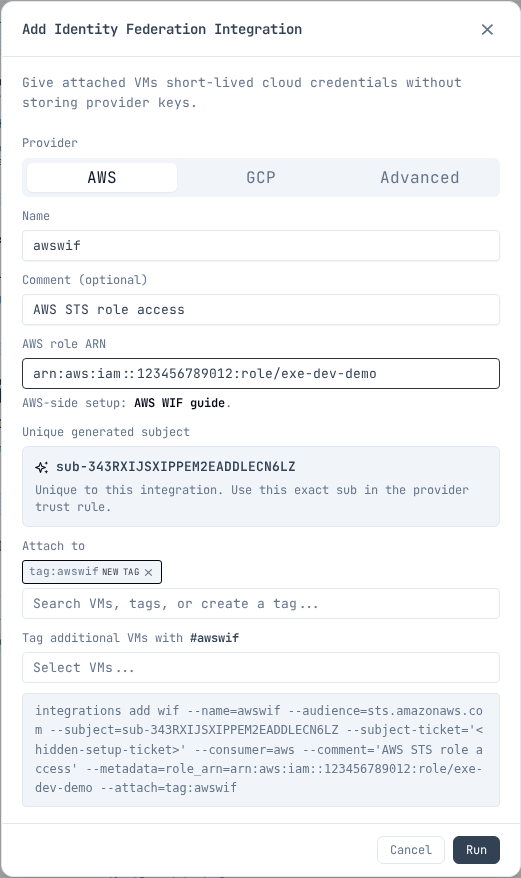
Open the [Integrations page](/integrations), choose `Identity Federation`, and
select `AWS`.
- `Name`: `awswif`
- `AWS role ARN`: the `AWS_ROLE_ARN` value from above
- `Attach to`: the VM or tag that should use this role
Copy the `Unique generated subject`, then click `Run`. The AWS role trust
policy below must use that exact `sub`.
 Set the copied subject in your shell before running the AWS commands:
```
export EXE_WIF_SUBJECT=sub-copy-from-the-integration
```
### Configure AWS
Create the IAM OIDC provider once per AWS account:
```
aws iam create-open-id-connect-provider \
--url https://exe.dev \
--client-id-list "$AWS_AUDIENCE"
```
Create the role trust policy:
```
cat > "$AWS_TRUST_POLICY_FILE" < "$AWS_PERMISSIONS_POLICY_FILE" < "$EXE_WIF_METADATA_FILE"
curl -fsS "$EXE_WIF_URL/token" | jq -r .token > "$AWS_WEB_IDENTITY_TOKEN_FILE"
```
For a team integration, use `https://${INTEGRATION_NAME}.team.exe.xyz` for
`EXE_WIF_URL` instead.
```
export AWS_ROLE_ARN="$(jq -r .role_arn "$EXE_WIF_METADATA_FILE")"
aws sts get-caller-identity
```
The AWS CLI and AWS SDKs read `AWS_ROLE_ARN` and
`AWS_WEB_IDENTITY_TOKEN_FILE`, then call AWS STS with the token file. exe.dev
does not put AWS access keys on the VM. For long-running processes, refresh
`AWS_WEB_IDENTITY_TOKEN_FILE` before the SDK needs to call STS again.
## Use cases
Common things to do from a VM with an assumed role. Each assumes
`AWS_ROLE_ARN` and `AWS_WEB_IDENTITY_TOKEN_FILE` are exported as shown
above.
### S3: artifacts and data
Sync build outputs, datasets, or static sites to a bucket:
```
aws s3 sync ./dist "s3://${BUCKET_NAME}/"
```
The permissions example in [Configure AWS](#configure-aws) grants scoped S3
read access; add `s3:PutObject` on the bucket for writes.
### ECR: push and pull container images
Build images on the VM and push them to a private registry:
```
export ECR_REGISTRY="${AWS_ACCOUNT_ID}.dkr.ecr.${AWS_REGION}.amazonaws.com"
aws ecr get-login-password | docker login --username AWS --password-stdin "$ECR_REGISTRY"
docker push "${ECR_REGISTRY}/${REPO_NAME}:${TAG}"
```
Grant `AmazonEC2ContainerRegistryPowerUser` or a policy scoped to the
repository ARN.
### CodeArtifact: private package registries
Install from and publish to private npm, PyPI, or Maven repositories with a
temporary token:
```
aws codeartifact login --tool npm \
--domain "$CA_DOMAIN" --repository "$CA_REPO"
npm install
npm publish
```
Use `--tool pip` or `--tool twine` for Python. Grant
`codeartifact:GetAuthorizationToken`, `sts:GetServiceBearerToken`, and the
read or publish actions the workload needs.
### Bedrock: model inference
Call Claude and other models with temporary credentials:
```
aws bedrock-runtime converse \
--model-id "$MODEL_ID" \
--messages '[{"role":"user","content":[{"text":"Hello"}]}]'
```
AWS SDKs pick up the web identity env vars automatically, so application code
needs no extra configuration. Grant `bedrock:InvokeModel` scoped to the model
ARNs you use.
### Terraform / IaC: state and deploys
Run `terraform plan` and `terraform apply` with an S3 state backend and
DynamoDB (or S3 native) locking:
```
terraform init
terraform plan
terraform apply
```
Terraform's AWS provider reads the same `AWS_ROLE_ARN` and
`AWS_WEB_IDENTITY_TOKEN_FILE` env vars. Grant access to the state bucket and
lock table, plus whatever the configuration manages.
## Keep it narrow
- Use one exe.dev WIF integration per AWS role or workload.
- Attach the integration only to the VM or tag that needs it.
- Bind `sts:AssumeRoleWithWebIdentity` to the exact exe.dev audience and
subject.
- Give the AWS role only the permissions the workload needs.
- Do not create or store AWS access keys as a fallback.
For additional exe.dev WIF integrations in the same AWS account, you usually
reuse the same IAM OIDC provider. Use the same `sts.amazonaws.com` audience,
create the new exe.dev integration, copy its `Unique generated subject`, and
grant that subject access to the role it should assume. Create a new provider
only when you want a separate trust boundary.
AWS references:
- [Create an IAM OIDC provider](https://docs.aws.amazon.com/IAM/latest/UserGuide/id_roles_providers_create_oidc.html)
- [Create a role for an OIDC identity provider](https://docs.aws.amazon.com/IAM/latest/UserGuide/id_roles_create_for-idp_oidc.html)
- [AssumeRoleWithWebIdentity](https://docs.aws.amazon.com/STS/latest/APIReference/API_AssumeRoleWithWebIdentity.html)
- [AWS SDK web identity token credentials](https://docs.aws.amazon.com/sdkref/latest/guide/feature-assume-role-credentials.html)
Set the copied subject in your shell before running the AWS commands:
```
export EXE_WIF_SUBJECT=sub-copy-from-the-integration
```
### Configure AWS
Create the IAM OIDC provider once per AWS account:
```
aws iam create-open-id-connect-provider \
--url https://exe.dev \
--client-id-list "$AWS_AUDIENCE"
```
Create the role trust policy:
```
cat > "$AWS_TRUST_POLICY_FILE" < "$AWS_PERMISSIONS_POLICY_FILE" < "$EXE_WIF_METADATA_FILE"
curl -fsS "$EXE_WIF_URL/token" | jq -r .token > "$AWS_WEB_IDENTITY_TOKEN_FILE"
```
For a team integration, use `https://${INTEGRATION_NAME}.team.exe.xyz` for
`EXE_WIF_URL` instead.
```
export AWS_ROLE_ARN="$(jq -r .role_arn "$EXE_WIF_METADATA_FILE")"
aws sts get-caller-identity
```
The AWS CLI and AWS SDKs read `AWS_ROLE_ARN` and
`AWS_WEB_IDENTITY_TOKEN_FILE`, then call AWS STS with the token file. exe.dev
does not put AWS access keys on the VM. For long-running processes, refresh
`AWS_WEB_IDENTITY_TOKEN_FILE` before the SDK needs to call STS again.
## Use cases
Common things to do from a VM with an assumed role. Each assumes
`AWS_ROLE_ARN` and `AWS_WEB_IDENTITY_TOKEN_FILE` are exported as shown
above.
### S3: artifacts and data
Sync build outputs, datasets, or static sites to a bucket:
```
aws s3 sync ./dist "s3://${BUCKET_NAME}/"
```
The permissions example in [Configure AWS](#configure-aws) grants scoped S3
read access; add `s3:PutObject` on the bucket for writes.
### ECR: push and pull container images
Build images on the VM and push them to a private registry:
```
export ECR_REGISTRY="${AWS_ACCOUNT_ID}.dkr.ecr.${AWS_REGION}.amazonaws.com"
aws ecr get-login-password | docker login --username AWS --password-stdin "$ECR_REGISTRY"
docker push "${ECR_REGISTRY}/${REPO_NAME}:${TAG}"
```
Grant `AmazonEC2ContainerRegistryPowerUser` or a policy scoped to the
repository ARN.
### CodeArtifact: private package registries
Install from and publish to private npm, PyPI, or Maven repositories with a
temporary token:
```
aws codeartifact login --tool npm \
--domain "$CA_DOMAIN" --repository "$CA_REPO"
npm install
npm publish
```
Use `--tool pip` or `--tool twine` for Python. Grant
`codeartifact:GetAuthorizationToken`, `sts:GetServiceBearerToken`, and the
read or publish actions the workload needs.
### Bedrock: model inference
Call Claude and other models with temporary credentials:
```
aws bedrock-runtime converse \
--model-id "$MODEL_ID" \
--messages '[{"role":"user","content":[{"text":"Hello"}]}]'
```
AWS SDKs pick up the web identity env vars automatically, so application code
needs no extra configuration. Grant `bedrock:InvokeModel` scoped to the model
ARNs you use.
### Terraform / IaC: state and deploys
Run `terraform plan` and `terraform apply` with an S3 state backend and
DynamoDB (or S3 native) locking:
```
terraform init
terraform plan
terraform apply
```
Terraform's AWS provider reads the same `AWS_ROLE_ARN` and
`AWS_WEB_IDENTITY_TOKEN_FILE` env vars. Grant access to the state bucket and
lock table, plus whatever the configuration manages.
## Keep it narrow
- Use one exe.dev WIF integration per AWS role or workload.
- Attach the integration only to the VM or tag that needs it.
- Bind `sts:AssumeRoleWithWebIdentity` to the exact exe.dev audience and
subject.
- Give the AWS role only the permissions the workload needs.
- Do not create or store AWS access keys as a fallback.
For additional exe.dev WIF integrations in the same AWS account, you usually
reuse the same IAM OIDC provider. Use the same `sts.amazonaws.com` audience,
create the new exe.dev integration, copy its `Unique generated subject`, and
grant that subject access to the role it should assume. Create a new provider
only when you want a separate trust boundary.
AWS references:
- [Create an IAM OIDC provider](https://docs.aws.amazon.com/IAM/latest/UserGuide/id_roles_providers_create_oidc.html)
- [Create a role for an OIDC identity provider](https://docs.aws.amazon.com/IAM/latest/UserGuide/id_roles_create_for-idp_oidc.html)
- [AssumeRoleWithWebIdentity](https://docs.aws.amazon.com/STS/latest/APIReference/API_AssumeRoleWithWebIdentity.html)
- [AWS SDK web identity token credentials](https://docs.aws.amazon.com/sdkref/latest/guide/feature-assume-role-credentials.html)