AWS Workload Identity Federation
Identity Federation lets an attached VM mint short-lived exe.dev OIDC tokens.
AWS trusts those tokens through an IAM OIDC provider, then exchanges them for
temporary role credentials with AssumeRoleWithWebIdentity. Use this instead
of storing AWS access keys on the VM.
Create the exe.dev integration in the web UI. Run the AWS commands from a machine with the AWS CLI.
Setup
Set values
One-time AWS account setup values. Choose these once for the AWS account:
export AWS_ACCOUNT_ID=123456789012

export AWS_AUDIENCE=sts.amazonaws.com
Per-role and per-exe.dev-integration values. Choose these for each workload:
export INTEGRATION_NAME=awswif
export ROLE_NAME=exe-dev-demo

export AWS_ROLE_ARN="arn:aws:iam::${AWS_ACCOUNT_ID}:role/${ROLE_NAME}"
export AWS_TRUST_POLICY_FILE="/tmp/exe-${ROLE_NAME}-trust-policy.json"
Add the exe.dev integration
Open the Integrations page, choose Identity Federation, and
select AWS.
Name:awswifAWS role ARN: theAWS_ROLE_ARNvalue from aboveAttach to: the VM or tag that should use this role
Copy the generated Issuer and Subject, then click Run. The AWS provider
and role trust policy below must use those exact values.
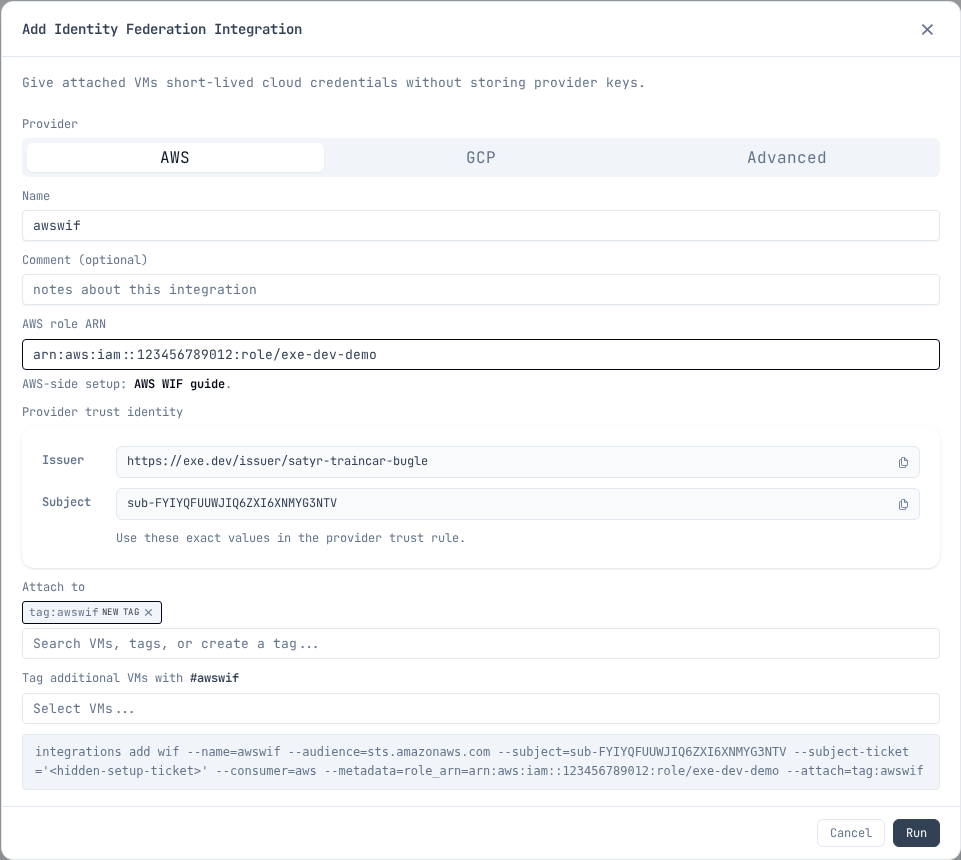
Set the copied values in your shell before running the AWS commands. Replace
these example values with the exact Issuer and Subject from the integration:
export EXE_WIF_ISSUER=https://exe.dev/issuer/example-team-workload
export EXE_WIF_SUBJECT=sub-ABCDEFGHIJKLMNOPQRSTUVWXYZ

export AWS_OIDC_CONDITION_PREFIX="${EXE_WIF_ISSUER#https://}"
export AWS_OIDC_PROVIDER_ARN="arn:aws:iam::${AWS_ACCOUNT_ID}:oidc-provider/${AWS_OIDC_CONDITION_PREFIX}"
The condition prefix and provider ARN use the issuer host and path, without
the https:// scheme.
Configure AWS
Create the IAM OIDC provider once per exe.dev user or team in the AWS account:
aws iam create-open-id-connect-provider \
  --url "$EXE_WIF_ISSUER" \
  --client-id-list "$AWS_AUDIENCE"
Create the role trust policy:
cat > "$AWS_TRUST_POLICY_FILE" <<EOF
{
  "Version": "2012-10-17",
  "Statement": [
    {
      "Effect": "Allow",
      "Principal": {
        "Federated": "${AWS_OIDC_PROVIDER_ARN}"
      },
      "Action": "sts:AssumeRoleWithWebIdentity",
      "Condition": {
        "StringEquals": {
          "${AWS_OIDC_CONDITION_PREFIX}:aud": "${AWS_AUDIENCE}",
          "${AWS_OIDC_CONDITION_PREFIX}:sub": "${EXE_WIF_SUBJECT}"
        }
      }
    }
  ]
}
EOF

aws iam create-role \
  --role-name "$ROLE_NAME" \
  --assume-role-policy-document "file://${AWS_TRUST_POLICY_FILE}"
Grant the role only the permissions your workload needs. For example:
export BUCKET_NAME=my-app-bucket
export AWS_PERMISSIONS_POLICY_FILE="/tmp/exe-${ROLE_NAME}-s3-read-policy.json"

cat > "$AWS_PERMISSIONS_POLICY_FILE" <<EOF
{
  "Version": "2012-10-17",
  "Statement": [
    {
      "Effect": "Allow",
      "Action": "s3:ListBucket",
      "Resource": "arn:aws:s3:::${BUCKET_NAME}"
    },
    {
      "Effect": "Allow",
      "Action": "s3:GetObject",
      "Resource": "arn:aws:s3:::${BUCKET_NAME}/*"
    }
  ]
}
EOF

aws iam put-role-policy \
  --role-name "$ROLE_NAME" \
  --policy-name exe-dev-demo-s3-read \
  --policy-document "file://${AWS_PERMISSIONS_POLICY_FILE}"
You do not need to attach a policy just to run
aws sts get-caller-identity as a smoke test after assumption.
Use it from the VM
From a VM that has the integration attached, use /metadata to read the AWS
role ARN you entered in the integration:
export INTEGRATION_NAME=awswif

export EXE_WIF_URL="https://${INTEGRATION_NAME}.int.exe.xyz"
export EXE_WIF_METADATA_FILE="/tmp/exe-${INTEGRATION_NAME}-aws-wif-metadata.json"
export AWS_WEB_IDENTITY_TOKEN_FILE="/tmp/exe-${INTEGRATION_NAME}-aws-web-identity-token"
export AWS_ROLE_SESSION_NAME="exe-${INTEGRATION_NAME}"

curl -fsS "$EXE_WIF_URL/metadata" > "$EXE_WIF_METADATA_FILE"
curl -fsS "$EXE_WIF_URL/token" | jq -r .token > "$AWS_WEB_IDENTITY_TOKEN_FILE"
For a team integration, use https://${INTEGRATION_NAME}.team.exe.xyz for
EXE_WIF_URL instead.
export AWS_ROLE_ARN="$(jq -r .role_arn "$EXE_WIF_METADATA_FILE")"

aws sts get-caller-identity
The AWS CLI and AWS SDKs read AWS_ROLE_ARN and
AWS_WEB_IDENTITY_TOKEN_FILE, then call AWS STS with the token file. exe.dev
does not put AWS access keys on the VM. For long-running processes, refresh
AWS_WEB_IDENTITY_TOKEN_FILE before the SDK needs to call STS again.
Use cases
Common things to do from a VM with an assumed role. Each assumes
AWS_ROLE_ARN and AWS_WEB_IDENTITY_TOKEN_FILE are exported as shown
above.
S3: artifacts and data
Sync build outputs, datasets, or static sites to a bucket:
aws s3 sync ./dist "s3://${BUCKET_NAME}/"
The permissions example in Configure AWS grants scoped S3
read access; add s3:PutObject on the bucket for writes.
ECR: push and pull container images
Build images on the VM and push them to a private registry:
export ECR_REGISTRY="${AWS_ACCOUNT_ID}.dkr.ecr.${AWS_REGION}.amazonaws.com"

aws ecr get-login-password | docker login --username AWS --password-stdin "$ECR_REGISTRY"
docker push "${ECR_REGISTRY}/${REPO_NAME}:${TAG}"
Grant AmazonEC2ContainerRegistryPowerUser or a policy scoped to the
repository ARN.
CodeArtifact: private package registries
Install from and publish to private npm, PyPI, or Maven repositories with a temporary token:
aws codeartifact login --tool npm \
  --domain "$CA_DOMAIN" --repository "$CA_REPO"

npm install
npm publish
Use --tool pip or --tool twine for Python. Grant
codeartifact:GetAuthorizationToken, sts:GetServiceBearerToken, and the
read or publish actions the workload needs.
Bedrock: model inference
Call Claude and other models with temporary credentials:
aws bedrock-runtime converse \
  --model-id "$MODEL_ID" \
  --messages '[{"role":"user","content":[{"text":"Hello"}]}]'
AWS SDKs pick up the web identity env vars automatically, so application code
needs no extra configuration. Grant bedrock:InvokeModel scoped to the model
ARNs you use.
Terraform / IaC: state and deploys
Run terraform plan and terraform apply with an S3 state backend and
DynamoDB (or S3 native) locking:
terraform init
terraform plan
terraform apply
Terraform's AWS provider reads the same AWS_ROLE_ARN and
AWS_WEB_IDENTITY_TOKEN_FILE env vars. Grant access to the state bucket and
lock table, plus whatever the configuration manages.
Keep it narrow
- Use one exe.dev WIF integration per AWS role or workload.
- Attach the integration only to the VM or tag that needs it.
- Bind
sts:AssumeRoleWithWebIdentityto the exact exe.dev audience and subject. - Give the AWS role only the permissions the workload needs.
- Do not create or store AWS access keys as a fallback.
Additional integrations owned by the same exe.dev user or team reuse its IAM OIDC provider. A different exe.dev user or team has a different issuer and needs its own provider. AWS accounts have a default quota of 100 IAM OIDC providers.
AWS references: